如今,将 CSS 放入 Javascript 几乎是常态——但如果我们可以反其道而行之呢?最近,我读了很多关于Houdini的文章,它使开发人员能够直接与 CSS 对象模型交互。
关于它的最酷的事情之一是它允许我们将 Javascript 放入我们的 CSS 中。在下面的示例中,我创建了一个背景效果,其中 Javascript位于 CSS中。每次刷新时,背景都是随机的。检查下面的CSS 选项卡以查看 CSS 中的 Javascript。
您甚至可以直接在您的 Javascript 代码中使用 CSS 变量,让您使用您在样式表中配置的标准颜色和其他设置。
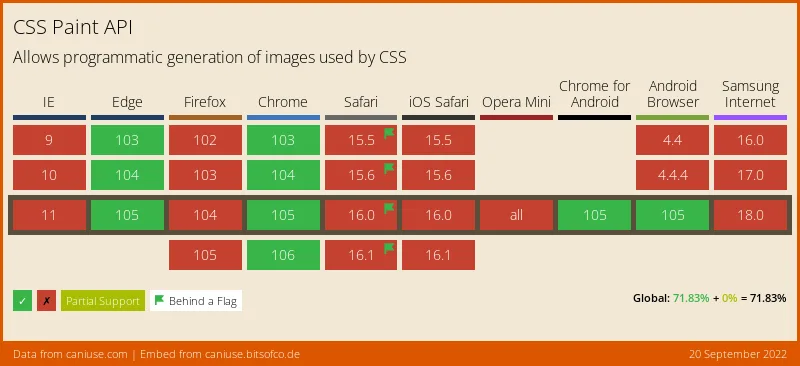
支持 Paint Worklet#
截至目前,这些功能仅适用于 Google Chrome 和 Edge 以及其他一些浏览器 – 因此,在尝试下面的演示时,请确保您正在使用其中一个。

演示#
类名更改
每当您更改元素的类时,CSS 中的 Javascript 都会重新渲染,这意味着只需向元素添加类就可以使用不同的颜色重新创建复杂的效果,如上所示!当您单击红色/蓝色之类的选项之一时- 唯一改变的是 div 的类名。
什么是 Paint Worklet?#
如果您以前使用过HTML 画布,则 Paint worklet 是一种使用您熟悉的技术为您的 CSS 创建图像的方法。我们可以通过将我们的工作集放入文件并使用以下行来注册自定义 CSS 绘制工作集:
CSS.paintWorklet.addModule('paint-worklet.js');
然后,我们可以使用该函数直接在我们的 CSS 中使用这些绘制工作集paint()。在我们开始之前,让我们看看我们如何创建我们的paint-worklet.js文件。
如何在 Javascript 中创建 Paint Worklet 文件#
让我们创建一个基本的绘制工作集。我们的paint worklet 文件将被调用paint-worklet.js。它将包含一个我们使用该registerPaint函数注册的类。最终,该类将像任何其他 Javascript 类一样工作 – 但类中的paint()函数将运行以生成图像。
该paint()函数具有三个参数:
ctx– 充当画布上下文,具有所有正常的画布功能。geom– 包含有关正在绘制的 CSS 元素的信息,例如宽度和高度。properties– 包含有关我们可以单独注册的 CSS 属性的附加信息。
下面,我们将创建我们的类,称为BackgroundCanvas. 我在下面编写的代码然后在画布上绘制随机圆圈,这些圆圈的大小是随机的,并且根据它们的模糊程度而有所不同。
这个函数中有各种可配置的选项,例如计数、模糊和半径,它们让我们可以调整效果的渲染方式。
class BackgroundCanvas {
    rand(min, max) {
        return Math.random() * ( max - min ) + min;
    }
    paint(ctx, geom, properties) {
        // Colors for background gradient
        let backgroundColors = [ '#000', '#000' ];
        // Colors for the circle colours
        let colors = [ '#202bc5', '#cc3d44' ];
        // Number of circles to render
        let count = 200;
        // The range of blur and radius values
        let blur = [ 10, 100 ]; // Min, Max blur
        let radius = [ 1, 40 ]; // Min, max radius
        // Clear out the entire canvas
        ctx.clearRect( 0, 0, geom.width, geom.height );
        // And use a blend mode to make the effect look cooler
        ctx.globalCompositeOperation = 'lighter';

        // Apply the background gradient
        let grd = ctx.createLinearGradient(0, geom.height, geom.width, 0);
        grd.addColorStop(0, backgroundColors[0]);
        grd.addColorStop(1, backgroundColors[1]);
        ctx.fillStyle = grd;
        // Fill the rectangle with the gradient
        ctx.fillRect(0, 0, geom.width, geom.height);

        // Then draw a circle for each value of count
        while(count--) {

            // Determine a random x, y, blur, and radius
            let thisRadius = this.rand( radius[0], radius[1] );
            let thisBlur = this.rand( blur[0], blur[1] );
            let x = this.rand( -100, geom.width + 100 );
            let y = this.rand( -100, geom.height + 100 );

            // Draw the circle, using the color, blur, and radius we defined
            ctx.beginPath();
            ctx.filter = `blur(${thisBlur}px)`;
            let grd = ctx.createLinearGradient(x - thisRadius / 2, y - thisRadius / 2, x + thisRadius, y + thisRadius);
            grd.addColorStop(0, colors[0]);
            grd.addColorStop(1, colors[1]);
            ctx.fillStyle = grd;
            ctx.arc( x, y, thisRadius, 0, Math.PI * 2 );
            ctx.closePath();
            ctx.fill();
        }
    }
}

// Register the class 'BackgroundClass' as being called 'BackgroundCanvas'
registerPaint('BackgroundCanvas', BackgroundCanvas);
要注册此绘制模块,请将以下 Javascript 添加到您的 HTML 文档中:
<script>
CSS.paintWorklet.addModule('paint-worklet.js');
</script>
如何在 CSS 中使用绘画模块#
现在我们已经注册了我们的绘画模块,我们可以在我们的 CSS 中调用它来产生我们的背景效果。由于我们调用了我们的绘画模块BackgroundCanvas,将它添加到我们的 CSS 中看起来像这样:
#paint {
    background: paint(BackgroundCanvasInline);
}
现在,我们上面编写的画布代码将在#paintdiv 上运行,并为其提供本文顶部 CodePen 中演示的背景。
在你的 CSS 中加入 Javascript#
现在我们已经介绍了绘画模块的工作原理,让我们看看如何将 Javascript 直接放入我们的 CSS 中。这样做的好处之一是我们最终可以直接从 CSS 变量中配置 Javascript。正如我所提到的,每当我们更改元素的类时,我们的 Javascript 都会重新渲染。所以我们可以有不同的类和不同的 CSS 变量设置,允许我们通过简单地改变我们的 CSS 来改变 Javascript。
#paint.red {
    --circleColorOne: "red";
    --circleColorTwo: "blue";
    --number: 200;
}
#paint.green {
    --circleColorOne: "#0054ff";
    --circleColorTwo: "#7fe427";
    --number: 250;
}
#paint.default {
    --circleColorOne: "#202bc5";
    --circleColorTwo: "#cc3d44";
}
#paint {
    --number: 300;
    --minBlur: 10;
    --maxBlur: 100;
    --minRadius: 1;
    --maxRadius: 40;
    --backgroundEffect: {
        let backgroundColors = [ '#000', '#000' ];
        let colors = [ var(--circleColorOne), var(--circleColorTwo) ];
        let count = var(--number);
        let blur = [ var(--minBlur), var(--maxBlur) ];
        let radius = [ var(--minRadius), var(--maxRadius) ];
        ctx.clearRect( 0, 0, geom.width, geom.height );
        ctx.globalCompositeOperation = 'lighter';
        let grd = ctx.createLinearGradient(0, geom.height, geom.width, 0);
        grd.addColorStop(0, backgroundColors[0]);
        grd.addColorStop(1, backgroundColors[1]);
        ctx.fillStyle = grd;
        ctx.fillRect(0, 0, geom.width, geom.height);

        while(count--) {
            let thisRadius = rand( radius[0], radius[1] );
            let thisBlur = rand( blur[0], blur[1] ),
                x = rand( -100, geom.width + 100 ),
                y = rand( -100, geom.height + 100 );

            ctx.beginPath();
            ctx.filter = `blur(${thisBlur}px)`;
            let grd = ctx.createLinearGradient(x - thisRadius / 2, y - thisRadius / 2, x + thisRadius, y + thisRadius);
            grd.addColorStop(0, colors[0]);
            grd.addColorStop(1, colors[1]);
            ctx.fillStyle = grd;
            ctx.arc( x, y, thisRadius, 0, Math.PI * 2 );
            ctx.closePath();
            ctx.fill();
        }
    };
    background: paint(BackgroundCanvasInline);
    padding: 2rem;
    font-family: -apple-system, Inter, BlinkMacSystemFont, 'Segoe UI', Roboto, Oxygen, Ubuntu, Cantarell, 'Open Sans', 'Helvetica Neue', sans-serif;
    border-radius: 4px;
    color: white;
    border-radius: 14px;
    font-weight: 900;
    font-size: 2rem;
    max-width: 600px;
    height: 400px;
}
这意味着您可以通过更新 CSS 变量来更改模糊、半径、颜色和圆数。我们只需要更新我们的paint-worklet.js文件来执行我们的 CSS。我们的新paint-worklet.js外观是这样的:
class BackgroundCanvasInline {
    static get inputProperties() {
        return ['--backgroundEffect'];
    }
    rand(min, max) {
        return Math.random() * ( max - min ) + min;
    }
    paint(ctx, geom, properties) {
        let parseCss = new Function('ctx', 'geom', 'rand', properties.get('--backgroundEffect').toString());
        parseCss(ctx, geom, this.rand);
    }
}

registerPaint('BackgroundCanvasInline', BackgroundCanvasInline);
请注意,我们可以--backgroundEffect使用该static get方法获取我们的变量。然后我们使用new Function符号执行我们的函数,传入适当的参数。
为什么要把 Javascript 放在你的 CSS 中?#
将 Javascript 添加到您的 CSS 中非常棒 – 这是一个足够好的理由,但主要好处是您可以使用 CSS 变量将画布元素的颜色、大小和视觉外观的所有变量直接存储在 CSS 中。
使用new Function()显然会带来安全隐患——但是,paint worklet 的功能非常有限,并且缺少globalThis/window对象,甚至缺少fetch功能。因此,风险很小。但是,我仍然建议将 Javascript 直接保存在 worklet 本身而不是 CSS 中是更好的做法。
无论如何,这种直接在 CSS 中应用绘制工作集是在 CSS 中呈现类似画布的功能的一种令人兴奋的方式,并且能够在 Javascript 中动态使用您的 CSS 变量非常酷。这篇文章的完整代码可以通过这个链接在 CodePen 上找到。

![21 个最佳 Javascript IDE 和代码编辑器 [CSS、HTML、JavaScript] 21 个最佳 Javascript IDE 和代码编辑器 [CSS、HTML、JavaScript]](https://www.code8cn.com/wp-content/uploads/2022/10/image-219-150x150.png)


