目录
- 1. 什么是Drawables?
- 2. 对视图使用可绘制对象
- 3. 加载位图和可绘制对象
- 4.XML 可拉
- 5. 矢量可绘制
- 6. 动画可绘制内容
- 7. NinePatch可绘制
- 8. 自定义可绘制对象
- 9. 练习:创建自定义圆角可绘制
1. 什么是Drawables?
可绘制资源是可以绘制的图形的一般概念。最简单的情况是图形文件(位图),它将通过类在Android中表示。BitmapDrawable
每个可绘制文件都作为单独的文件存储在其中一个 res/可绘制文件夹中。通常,您会将不同分辨率的位图存储在 res/可绘制的 -mdpi、-hdpi、-xhdpi、-xxhdpi 子文件夹中。 默认情况下,ADT 项目创建向导会创建这些文件夹。如果这些位图位于不同的文件夹中,Android 系统会根据设备配置自动选择正确的位图。
如果未为所有支持的分辨率提供位图,Android 系统将按最接近的拟合比例向上或向下缩放。这通常是不希望的,因为位图可能会变得模糊。
除了图形文件之外,安卓还支持 XML 可绘制对象和 9 补丁图形。XML 可绘制对象用于描述形状(颜色、边框、渐变)、状态、过渡等。
9 曲面片图形用于定义在使用此图形的视图大于图形时应拉伸图形的哪个部分。
可绘制内容也可以用 Java 代码编写。实现的每个对象都可以用作DrawableDrawable in code.
2. 对视图使用可绘制对象
可绘制对象在 XML 中通过以下方式引用,文件名是没有文件扩展名的文件名。例如,要访问 res/可绘制/hello.png可绘制,您可以使用以下代码段中所示。@drawable/filenamefilename@drawable/hello
<TextView xmlns:android="http://schemas.android.com/apk/res/android"
    android:id="@+id/textView1"
    android:layout_width="wrap_content"
    android:layout_height="wrap_content"
    android:background="@drawable/hello"
android:text="@string/hello_world" />在代码中,还可以将可绘制对象分配给视图。大多数视图接受资源 ID 作为输入参数。例如,下面的代码演示如何将可绘制对象设置为 .ImageView
ImageView imageView = (ImageView) findViewById(R.id.image);
imageView.setImageResource(R.drawable.hello);
3. 加载位图和可绘制对象
Android 允许您使用该类来处理位图。本节介绍如何通过 Java 代码创建对象以及如何转换为对象,反之亦然。BitmapBitmapBitmapDrawable
如果需要,可以在代码中加载任何可访问的位图文件,并将它们转换为对象。Drawables
下面的代码示例演示如何为 assets 文件夹创建一个对象,并将其分配给 .BitmapImageView
        AssetManager manager = getAssets();

        // read a Bitmap from Assets
        InputStream open = null;
        try {
            open = manager.open("logo.png");
            Bitmap bitmap = BitmapFactory.decodeStream(open);
            // Assign the bitmap to an ImageView in this layout
            ImageView view = (ImageView) findViewById(R.id.imageView1);
            view.setImageBitmap(bitmap);
        } catch (IOException e) {
            e.printStackTrace();
        } finally {
            if (open != null) {
                try {
                    open.close();
                } catch (IOException e) {
                    e.printStackTrace();
                }
            }
        }
您还可以从 res/可绘制文件夹中的可绘制对象作为源代码中的对象进行访问。下面的代码演示了这一点。Bitmap
Bitmap b = BitmapFactory.decodeResource(getResources(), R.drawable.ic_action_search);您可以基于新的权重和高度定义(以像素为单位)创建比例位图。
Bitmap originalBitmap = <initial setup>;

Bitmap resizedBitmap =
   Bitmap.createScaledBitmap(originalBitmap, newWidth, newHeight, false);
若要将对象转换为 ,可以使用以下代码。BitmapDrawable
# Convert Bitmap to Drawable
Drawable d = new BitmapDrawable(getResources(),bitmap);
4.XML 可拉
4.1. 形状可绘制对象
形状可绘制是XML文件,它允许定义具有颜色,边框和渐变的几何对象,这些对象可以分配给。使用 XML 形状可绘制对象的优点是,它们会自动调整到正确的大小。Views
以下清单显示了可绘制形状的示例。
<?xml version="1.0" encoding="UTF-8"?>
<shape
    xmlns:android="http://schemas.android.com/apk/res/android"
    android:shape="rectangle">
    <stroke
        android:width="2dp"
        android:color="#FFFFFFFF" />
    <gradient
        android:endColor="#DDBBBBBB"
        android:startColor="#DD777777"
        android:angle="90" />
    <corners
        android:bottomRightRadius="7dp"
        android:bottomLeftRadius="7dp"
        android:topLeftRadius="7dp"
        android:topRightRadius="7dp" />
</shape>
例如,您可以将该可绘制对象分配给布局的背景属性。
<?xml version="1.0" encoding="utf-8"?>
<LinearLayout xmlns:android="http://schemas.android.com/apk/res/android"
    android:layout_width="match_parent"
    android:layout_height="match_parent"
    android:background="@drawable/myshape"
    android:orientation="vertical" >

    <EditText
        android:id="@+id/editText1"
        android:layout_width="match_parent"
        android:layout_height="wrap_content"
     >
    </EditText>

    <RadioGroup
        android:id="@+id/radioGroup1"
        android:layout_width="match_parent"
        android:layout_height="wrap_content" >

        <RadioButton
            android:id="@+id/radio0"
            android:layout_width="wrap_content"
            android:layout_height="wrap_content"
            android:checked="true"
            android:text="@string/celsius" >
        </RadioButton>

        <RadioButton
            android:id="@+id/radio1"
            android:layout_width="wrap_content"
            android:layout_height="wrap_content"
            android:text="@string/fahrenheit" >
        </RadioButton>
    </RadioGroup>

    <Button
        android:id="@+id/button1"
        android:layout_width="wrap_content"
        android:layout_height="wrap_content"
        android:text="@string/calc"
        android:onClick="myClickHandler">
    </Button>

</LinearLayout>
4.2. 状态可绘制
状态可绘制性允许定义状态。对于每个状态,可以将不同的可绘制对象分配给 。例如,下面根据按钮的状态为按钮定义不同的可绘制对象。View
<?xml version="1.0" encoding="utf-8"?>
<selector xmlns:android="http://schemas.android.com/apk/res/android">

    <item android:drawable="@drawable/button_pressed"
        android:state_pressed="true" />
    <item android:drawable="@drawable/button_checked"
        android:state_checked="true" />
    <item android:drawable="@drawable/button_default" />

</selector>
4.3. 过渡可绘制对象
过渡可绘制允许定义可以在编码中触发的过渡。
<?xml version="1.0" encoding="utf-8"?>
<transition xmlns:android="http://schemas.android.com/apk/res/android">
    <item android:drawable="@drawable/first_image" />
    <item android:drawable="@drawable/second_image" />
</transition>
final ImageView image = (ImageView) findViewById(R.id.image);
final ToggleButton button = (ToggleButton) findViewById(R.id.button);
button.setOnClickListener(new OnClickListener() {
@Override
public void onClick(final View v) {
TransitionDrawable drawable = (TransitionDrawable) image.getDrawable();
if (button.isChecked()) {
drawable.startTransition(500);
} else {
drawable.reverseTransition(500);
}
}
});5. 矢量可绘制
从 API 级别 21 开始,您可以在 Android 应用程序中使用矢量可绘制对象。这些类似于svg文件,但范围有限。使用矢量可绘制对象自动缩放到设备的密度。以下清单演示了它在矢量可绘制.xml文件中的用法。
 <vector xmlns:android="http://schemas.android.com/apk/res/android"
     android:height="64dp"
     android:width="64dp"
     android:viewportHeight="600"
     android:viewportWidth="600" >
     <group
         android:name="rotationGroup"
         android:pivotX="300.0"
         android:pivotY="300.0"
         android:rotation="45.0" >
         <path
             android:name="v"
             android:fillColor="#000000"
             android:pathData="M300,70 l 0,-70 70,70 0,0 -70,70z" />
     </group>
</vector>安卓还支持通过该类进行动画矢量绘制。它允许将矢量可绘制对象与动画相结合。使用矢量可绘制对象,您可以创建不同的图像并在它们之间变形,并可以通过代码启动和停止它。您无法控制动画,也不能在特定帧处暂停动画。AnimatedVectorDrawable
矢量可绘制对象也可通过支持库作为 的旧平台使用。VectorDrawableCompat
https://shapeshifter.design/ 提供在线工具来创建动画矢量可绘制对象。
6. 动画可绘制内容
还可以定义动画可绘制对象,并通过该方法将其分配给 。ViewsetBackgroundResource()
<!-- Animation frames are phase*.png files inside the
 res/drawable/ folder -->
 <animation-list android:id="@+id/selected" android:oneshot="false">
    <item android:drawable="@drawable/phase1" android:duration="400" />
    <item android:drawable="@drawable/phase2" android:duration="400" />
    <item android:drawable="@drawable/phase3" android:duration="400" />
 </animation-list>
ImageView img = (ImageView)findViewById(R.id.yourid);
img.setBackgroundResource(R.drawable.your_animation_file);
// Get the AnimationDrawable object.
AnimationDrawable frameAnimation = (AnimationDrawable) img.getBackground();
// Start the animation (looped playback by default).
frameAnimation.start();或者,您可以实现一个扩展和实现的类。DrawableAnimatable
7. NinePatch可绘制
NinePatch可绘制对象是具有一个像素附加边框的可绘制对象。在顶部和左侧,您可以定义如果视图的“可绘制对象”变小,则应缩放的区域。这是拉伸区域。
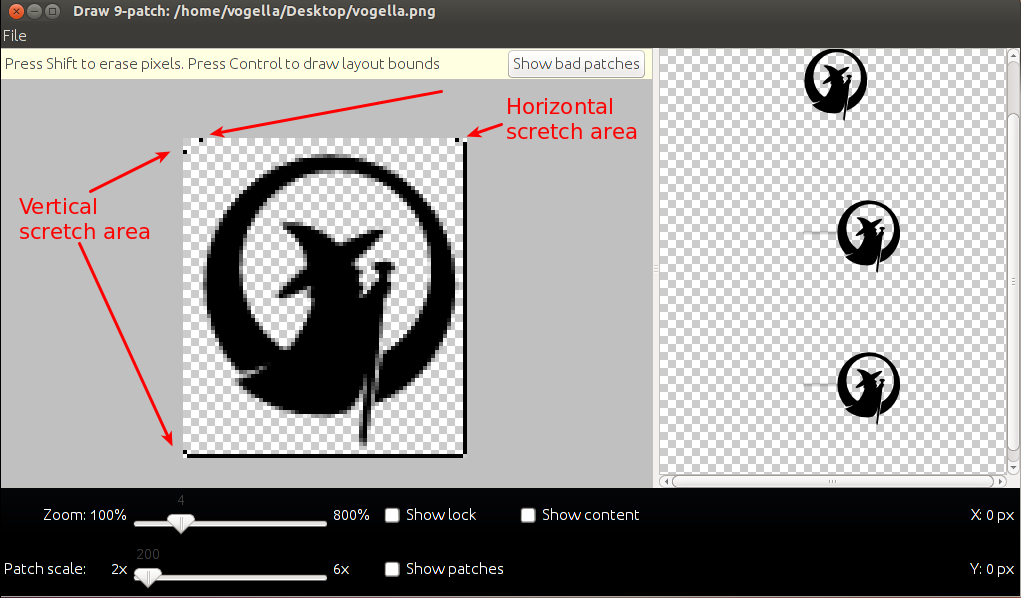
在右侧和底部,您可以定义应放置文本的区域,如果该区域用于可以在其上写入文本的视图(例如按钮)。Drawable
ADT 在 android-sdk/tools 安装文件夹中提供该程序,这使得创建 9 个补丁可绘制对象变得容易。draw9patch
8. 自定义可绘制对象
您还可以创建自定义可绘制对象,这些可使用画布 API 进行显示。对于这些可绘制对象,您可以使用完整的 Canvas API 来根据需要进行设计。
9. 练习:创建自定义圆角可绘制
基于“空活动”模板创建一个新的安卓项目,其顶级包名称为 com.vogella.android.绘制。
创建以下自定义可绘制类。
package com.vogella.android.drawables.custom;

import android.graphics.Bitmap;
import android.graphics.BitmapShader;
import android.graphics.Canvas;
import android.graphics.ColorFilter;
import android.graphics.Paint;
import android.graphics.PixelFormat;
import android.graphics.RectF;
import android.graphics.Shader;
import android.graphics.drawable.Drawable;

public class MyRoundCornerDrawable extends Drawable {

    private Paint paint;

    public MyRoundCornerDrawable(Bitmap bitmap) {
        BitmapShader shader;
        shader = new BitmapShader(bitmap, Shader.TileMode.CLAMP, Shader.TileMode.CLAMP);
        paint = new Paint();
        paint.setAntiAlias(true);
        paint.setShader(shader);
    }

    @Override
    public void draw(Canvas canvas) {
        int height = getBounds().height();
        int width = getBounds().width();
        RectF rect = new RectF(0.0f, 0.0f, width, height);
        canvas.drawRoundRect(rect, 30, 30, paint);
    }

    @Override
    public void setAlpha(int alpha) {
        paint.setAlpha(alpha);
    }

    @Override
    public void setColorFilter(ColorFilter cf) {
        paint.setColorFilter(cf);
    }

    @Override
    public int getOpacity() {
        return PixelFormat.TRANSLUCENT;
    }

}要使用它,请将activity_main布局文件更改为以下内容。
<RelativeLayout xmlns:android="http://schemas.android.com/apk/res/android"
    xmlns:tools="http://schemas.android.com/tools"
    android:layout_width="match_parent"
    android:layout_height="match_parent"
    tools:context=".MainActivity" >

    <ImageView
        android:id="@+id/image"
        android:layout_width="fill_parent"
        android:layout_height="fill_parent"
        android:layout_centerHorizontal="true"
        android:layout_centerVertical="true"
        android:contentDescription="TODO" />

</RelativeLayout>
将您的类更改为以下内容。该代码假定您的原始文件夹中有一个名为 dog.png 的位图。MainActivity
package com.vogella.android.drawables.custom;

import java.io.InputStream;

import android.app.Activity;
import android.graphics.Bitmap;
import android.graphics.BitmapFactory;
import android.os.Bundle;
import android.view.Menu;
import android.widget.ImageView;

public class MainActivity extends Activity {

    @Override
    protected void onCreate(Bundle savedInstanceState) {
        super.onCreate(savedInstanceState);
        setContentView(R.layout.activity_main);
        ImageView button = (ImageView) findViewById(R.id.image);
        InputStream resource = getResources().openRawResource(R.raw.dog);
        Bitmap bitmap = BitmapFactory.decodeStream(resource);
        button.setBackground(new MyRoundCornerDrawable(bitmap));
    }

}


