现代网页设计经常使用大型介绍图片。这些大图像将产品或服务框在网站顶部。
这让我想到了如何使用 WebGL 来制作类似于梵高的《星夜》的艺术效果。我创造的是类似的东西,如果你愿意,它可以很好地转化为液体。
步骤 1. Three.JS#
Three.js 是一个 Javascript 库,可让您轻松创建 WebGL 3d 对象。为了实现我们的效果,我们将遵循几个关键步骤:
- 1.用Three.JS创建几何体(形状)
- 2.将其渲染到 HTML5 画布上
- 3.将这个几何数据传递给着色器
- 4.使用 Javascript制作动画
- 5.使用着色器操纵几何体
因此,考虑到这一点,让我们看一下我们的 Javascript 片段,它涵盖了前 3 点。
    // Please view github or codepen demo for entire code
    const noise = await loader('./shaders/noise.glsl');
    const fragment = await loader('./shaders/fragment.glsl');
    const vertex = await loader('./shaders/vertex.glsl');

    const renderer = new THREE.WebGLRenderer({
        powerPreference: "high-performance",
        antialias: true,
        alpha: true,
        canvas: canvas // canvas is the Id for our HTML5 canvas. Remove this line and Three will auto create a canvas.
    });

    // Get el width and height
    let elWidth = window.innerWidth;
    let elHeight = window.innerHeight

    // Set sizes and set scene/camera
    renderer.setSize( elWidth, elHeight );
    document.body.appendChild( renderer.domElement )
    renderer.setPixelRatio( elWidth/elHeight );
    const scene = new THREE.Scene();
    const camera = new THREE.PerspectiveCamera( 75, elWidth / elHeight, 0.1, 1000 );

    let i = 2;
    // Check on colors to use
    let high = config.colors[i].high;
    let low = config.colors[i].low;

    // Create a plane, and pass that through to our shaders
    let geometry = new THREE.PlaneGeometry(600, 600, 100, 100);
    let material = new THREE.ShaderMaterial({
        uniforms: {
            // All of these variables are passed to our shaders
            // which are then passed to the GPU
            u_lowColor: {type: 'v3', value: low },
            u_highColor: {type: 'v3', value: high },
            u_time: {type: 'f', value: 0},
            u_resolution: {type: 'v2', value: new THREE.Vector2(elWidth, elHeight) },
            u_mouse: {type: 'v2', value: new THREE.Vector2(0, 0) },
            u_height: {type: 'f', value: 1},
            u_manipulate: {type: 'f', value: 1 },
            u_veinDefinition: {type: 'f', value: 20 },
            u_goCrazy: { type: 't', value: 1 },
            u_inputTexture: {type: 't', value: lion},
            u_scale: {type: 'f', value: 0.85 },
            u_clickLength: { type: 'f', value: 1},
            u_rand: { type: 'f', value: randomInteger(0, 10) },
            u_rand: {type: 'f', value: new THREE.Vector2(randomInteger(6, 10), randomInteger(8, 10)) }
        },
        fragmentShader: noise + fragment,
        vertexShader: noise + vertex,
    });
    // Create the mesh and position appropriately
    let mesh = new THREE.Mesh(geometry, material);
    mesh.position.set(0, 0, -300);
    scene.add(mesh);

    // This function when run will animate the renderer
    // Meaning for every animation frame the 3d model
    // will be rerendered onto the canvas.
    const animate = function () {
        requestAnimationFrame( animate );
        renderer.render( scene, camera );
        document.body.appendChild(renderer.domElement);
        mesh.material.uniforms.u_time.value = t;
        if(t < 10 && backtrack == false) {
            t = t + 0.005;
        } else {
            backtrack = true;
            t = t - 0.005;
            if(t < 0) {
                backtrack = false;
            }
        }
    };
我没有包括所有细节,但这里有一些关键点:
- uniforms: {} 中的统一变量直接传递给我们将要编写的着色器代码。当我们更新这些时,它将允许我们实时更新我们的 3d 对象。
- 着色器位置在 ShaderMaterial() 函数中提到
- 然后我们请求一个动画帧来重新渲染 3d 对象。注意在 animate() 函数中我们增加了 t(时间)和 uniform 变量,创建了动画
步骤 2. 着色器#
如果您不熟悉什么是着色器,它们本质上允许您操纵几何体的颜色和几何体的位置。有两种类型的着色器,片段(用于颜色)和顶点(用于位置)。这些会在渲染之前改变形状。
对于本教程,我们的主要重点是片段着色器。我们将使用噪声来产生液体效果,我们将使用的特定噪声称为分形布朗噪声 (FBM)。FBM 产生的噪声示例如下所示:
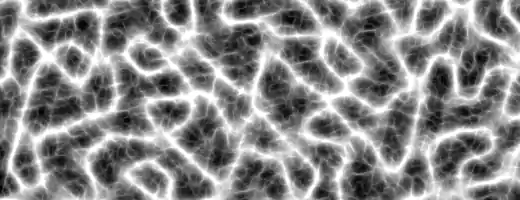
别担心,您不需要知道如何创建这些噪音效果,事实上,您已经获得了奥斯卡奖。这些噪声函数的完整代码可在线获取,您可以在文件shaders/夹中的 GitHub Repo 中找到它们。
我们的顶点着色器是默认的顶点着色器,但是我们可以看下面的代码来了解片段着色器是如何工作的:
// Main function
void main() {
    // We have to adjust the effect to fit our resolution.
    // Heavily modified FBM function from https://thebookofshaders.com/13/
    vec2 res = (gl_FragCoord.xy + 100.) / (u_resolution.xy * u_scale);

    // Next lets get our colors
    vec3 highColor = rgb(u_highColor.r, u_highColor.g, u_highColor.b);
    vec3 lowColor = rgb(u_lowColor.r, u_lowColor.g, u_lowColor.b);

    // Set a random color
    vec3 color = vec3(23.0);

    // This is a randomised function based on fbm and some other variables
    // that we can adjust in our Javascript
    vec2 fbm1 = vec2(10.);
    fbm1.x = fbm( res + 0.05 * u_time) * snoise(res) * u_goCrazy;
    fbm1.y = fbm( res + vec2(3.0)) / (u_manipulate - snoise(res)) * 9. * u_goCrazy / u_veinDefinition * u_clickLength * 5.;

    // Next we adjust it all based on mouse position, time, and qfbm1
    vec2 r = vec2(0.);
    r.x = fbm( res + fbm1 * u_time * 0.1 ) + -sin(u_mouse.x) + 600.;
    r.y = fbm( res + fbm1 * u_time * 0.5 ) * -u_mouse.y;

    // And create a float of fbm, for use in the final color
    float f = fbm(res+r) * 1.;

    // Then we mix all our colors together
    color = mix(highColor*2., lowColor, f*3.);
    color = mix(color, lowColor, clamp(length(fbm1),0.0,2.0)); // * snoise(st) * 51.9
    color = mix(color, highColor, clamp(length(r.y),0.0,3.0));

    // And output them for render
    gl_FragColor = vec4((f*f*f*0.9*f*f+.5*f)*color,1.);
}
这个特殊的片段着色器很酷的一点是它为我们的演示渲染了一个很酷的噪声效果,但如果我们增加设置,它也可以兼作一个非常简单的液态水片段着色器。
我们的统一变量都在片段着色器的顶部定义,但没有在上面列出。它们列在表格中uniform float u_variableName;。
步骤 3. 事件监听器#
最后,我们将一些典型的事件侦听器添加到我们的代码中,以跟踪鼠标位置以及范围选择器位置。这使我们能够调整效果并在用户四处移动时对其进行动画处理。
这可能是最直接的 vanilla JS 部分。在大多数情况下,我们只是通过我们之前定义的网格更新统一变量 – mesh.material.uniforms...。当这些更新时,我们的animate()函数会在我们的 HTML5 画布中重新呈现新对象,因此我们的光标位置和与画布的交互会对 WebGL 代码产生实时影响。
    /* event listeners */
    document.getElementById('range').addEventListener('input', function(e) {
        // Update 'range' selector
        mesh.material.uniforms.u_manipulate.value = this.value;
    })
    document.getElementById('veins').addEventListener('input', function(e) {
        // Update 'veins' selector
        mesh.material.uniforms.u_veinDefinition.value = this.value;
    })
    document.getElementById('crazy').addEventListener('input', function(e) {
        // Update 'crazy' selector
        mesh.material.uniforms.u_goCrazy.value = this.value;
    })

    document.querySelectorAll('.color').forEach(function(item) {
        // Selector a color
        item.addEventListener('click', function(e) {
            let i = parseFloat(this.getAttribute('data-id'));
            mesh.material.uniforms.u_highColor.value = config.colors[i].high;
            mesh.material.uniforms.u_lowColor.value = config.colors[i].low;
        });
    });

    // Variables to track settings
    let reduceVector;
    let increasePressure;
    let reducePressure;
    let prevX = 0;
    let prevY = 0;
    let curValueX = 0;
    let curValueY = 0;
    let mouseEnterX = 0;
    let mouseEnterY = 0;

    // On move effect
    document.body.addEventListener('pointermove', function(e) {
        if(typeof reduceVector !== "undefined") {
            clearInterval(reduceVector);
            curValueX = 0;
            curValueY = 0;
        }
        let mouseMoveX = mouseEnterX - e.pageX;
        let mouseMoveY = mouseEnterY - e.pageY;
        mesh.material.uniforms.u_mouse.value = new THREE.Vector2(prevX + (mouseMoveX / elWidth), prevY + (mouseMoveY / elHeight));
    });

    // Animations on pointerdown and pointerup, using setInterval 60fps
    document.getElementById('canvas').addEventListener('pointerdown', function(e) {
        if(typeof reducePressure !== "undefined") clearInterval(reducePressure);
        increasePressure = setInterval(function() {
            if(mesh.material.uniforms.u_clickLength.value < 3) {
                mesh.material.uniforms.u_clickLength.value += 0.03;
            }
        },1000/60);
    });
    document.getElementById('canvas').addEventListener('pointerup', function(e) {
        if(typeof increasePressure !== "undefined") clearInterval(increasePressure);
        reducePressure = setInterval(function() {
            if(mesh.material.uniforms.u_clickLength.value > 1) {
                mesh.material.uniforms.u_clickLength.value -= 0.03;
            }
        },1000/60);
    });
结论#
我们完成了。之后,我们将拥有创建效果所需的大部分组件。感谢阅读 – 您可以找到包括以下效果的完整代码在内的资源:

![21 个最佳 Javascript IDE 和代码编辑器 [CSS、HTML、JavaScript]](https://www.code8cn.com/wp-content/uploads/2022/10/image-219-150x150.png "21 个最佳 Javascript IDE 和代码编辑器 [CSS、HTML、JavaScript]")
