最近, Apple 开始在 Apple Music 上推出有吸引力的动画卡片。像这样的动画和效果确实推动了与网站的互动,并最终带来更多的转化。
我认为这是一种非常酷的展示卡片的方式,它正在成为一种在网络上显示内容的更普遍的方式。本教程将介绍掌握此效果的要点。
步骤 1. Three.JS#
和我在 WebGL 上做的很多教程一样,我们将使用 Three.JS 来实现这个效果。我们将使用的过程看起来有点像这样:
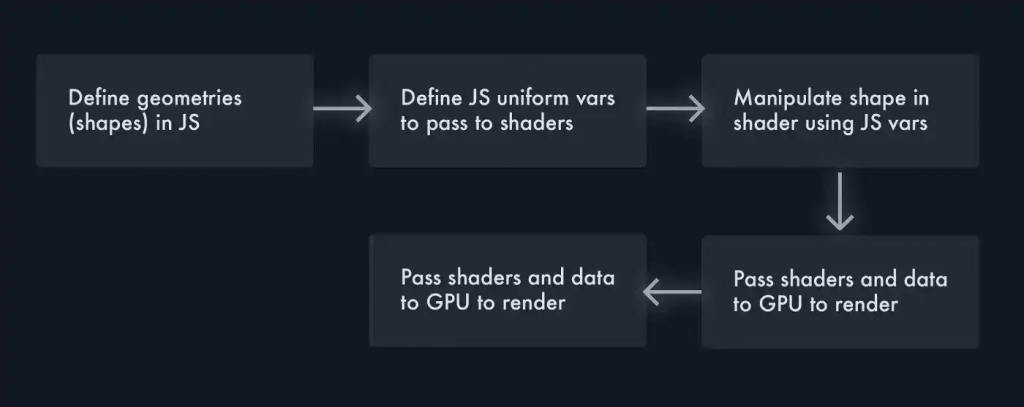
导入 Three.js 后,我们在 JS 中设置所有内容。这里要注意的关键是可以更改并立即导致 WebGL 渲染更改的统一变量。
    // Create a plane, and pass that through to our shaders
    let geometry = new THREE.PlaneGeometry(600, 600, 100, 100);
    let material = new THREE.ShaderMaterial({
        // These uniform variables can be adjusted in JS and are passed into the shader
        // After that they are passed into the GPU and rendered. You can alter these values
        // and change them through the mesh i.e. mesh.material.uniforms.u_height.value = x
        uniforms: {
            u_lowColor: {type: 'v3', value: low },
            u_highColor: {type: 'v3', value: high },
            u_time: {type: 'f', value: 0},
            u_height: {type: 'f', value: 1},
            u_rand: {type: 'f', value: new THREE.Vector2(randomInteger(6, 10), randomInteger(8, 10)) }
        },
        // These two are links to our fragment and vertex shaders
        // See full code for more details
        fragmentShader: noise + fragment,
        vertexShader: noise + vertex,
    });

    // Create the mesh and position appropriately
    let mesh = new THREE.Mesh(geometry, material);
    mesh.position.set(0, 0, -300);
    scene.add(mesh);
步骤 2. 着色器#
在我们的代码中,我们目前有一个平板,当我们在浏览器中加载它时,它只会显示为平板。该表由许多顶点组成,这也是在我们的 Javascript 中决定的(顶点是我们创建几何图形时的参数之一)。着色器在每个顶点调整我们在 Javascript 中创建的形状,并用类似于 C 的语言编写。
要创建折叠效果,我们需要将纸张更改为弯曲并折叠自身。我们还需要调整颜色,使纸张的某些部分比其他部分更暗。由于我们可以更新传递给着色器的变量,我们可以添加自定义悬停效果。
WebGL 中只有两种着色器——顶点和片段,它们分别控制位置和颜色。对于我们的顶点着色器,我们将调整沿 z 轴的点,使其在某些点上升并像一张纸一样折叠。我们还将使用噪声在 x 和 y 轴上添加一些随机定位。
    vDistortion = snoise(vUv.xx * 3. - vec2(u_time / u_rand.x, u_time / u_rand.x) + cos(vUv.yy) * u_rand.y) * u_height;
    xDistortion = snoise(vUv.xx * 1.) * u_height * u_rand.x / 10.;
    vec3 pos = position;
    pos.z += (vDistortion * 55.);
    pos.x += (xDistortion * 55.);
    pos.y += (sin(vUv.y) * 55.);

    gl_Position = projectionMatrix * modelViewMatrix * vec4(pos, 1.0);
vUv指的是顶点的位置,所以vUv.x是[x],vUv.xx是[x,x]等。
对于我们的片段着色器,我们将混合我们在 Javascript 中定义的低颜色和高颜色,并根据我们在顶点着色器中使用 mix() 函数创建的 z 轴偏移来显示它们。
    vec3 highColor = rgb(u_highColor.r, u_highColor.g, u_highColor.b);

    vec3 colorMap = rgb(u_lowColor.r, u_lowColor.g, u_lowColor.b);

    colorMap = mix(colorMap, highColor, vDistortion);

    gl_FragColor = vec4(colorMap, 1.);
步骤 3. 轮播#
我们希望我们的轮播既可滚动又可拖动。为此,我们需要参与 4 种不同类型的事件:
- pointerdown — 用户点击了轮播
- pointerup — 用户已完成拖动
- pointermove — 用户正在拖动轮播
- wheel — 用户在轮播中滚动
完成!#
完整的代码可以通过下面的链接查看。通过本教程,您可以轻松了解如何开始利用 WebGL 使您的最新项目更具交互性。希望您喜欢本教程,并查看以下内容以获取源代码:


