课程内容 – 第 1 天
- 1) UNIX 介绍
- 1.1) UNIX操作系统
- 1.2) 文件和进程
- 1.3) 目录结构
- 1.4) UNIX 程序
- 2) UNIX 中的目录导航和控制
- 2.1) 列出文件和目录
- ls
- 2.2)目录“.” 和 ”..”
- 2.3) 使用文件和目录
- mkdir
- rmdir
- 2.1) 列出文件和目录
- 3) UNIX/Linux 下的文件维护命令
- 3.1) 复制文件
- cp
- 3.2) 移动文件
- MV
- 3.3) 删除文件和目录
- R M
- 3.4) 文件权限
- 改变模式
- 3.5) 所有权
- chown
- 3.6) 集团所有权
- chgrp
- 3.7) 建立文件链接
- ln
- 3.8) 更新文件的ACCESS时间
- touch
- 3.1) 复制文件
- 4) UNIX/Linux 中的显示命令
- 4.1) 显示信息
- echo
- 4.2) 显示文件
- cat
- 4.3) 翻阅文件
- more, less, and pg
- 4.4) 文件的显示部分
- head
- tail
- 4.1) 显示信息
- 5) 在 UNIX/Linux 中查看系统资源
- 5.1) 总结磁盘和文件的使用情况
- df
- du
- 5.2) 进程
- ps
- kill
- 5.3) 用户
- who
- which
- 5.4) 主机名
- hostname
- script
- 5.5) 日期/时间
- date
- 5.1) 总结磁盘和文件的使用情况
课程内容 – 第 2 天
- 6) UNIX 中的 shell
- 6.1) 内置命令
- 6.2) 环境变量
- 6.3) 伯恩外壳
- 6.4) C 外壳
- 6.5) 作业控制与调度
- 作业控制——后台作业
- bg
- fg
- 作业控制 – 不挂断
- nohup
- 调度
- at
- 定时任务表
- crontab
- 作业控制——后台作业
- 7) UNIX 中的特殊 UNIX 特性
- 7.1) 文件描述符
- 7.2) 文件重定向
- 7.3) 其他特殊命令和符号
- 7.4) 外卡
- 8) UNIX/Linux 中的文本处理
- 8.1) 正则表达式
- 8.2) 文本处理命令
- 8.2.1) GREP
- 8.2.2) SED
- 8.2.3) AWK
课程内容 – 第 3 天
- 9) UNIX/Linux 中其他有用的命令
- 9.1) 使用文件
- 9.1.1) cmp
- 9.1.2) diff
- 9.1.3) cut
- 9.1.4) touch
- 9.1.5) wc
- 9.1.6) ln
- 9.1.7) sort
- 9.1.8) tee
- 9.1.9) uniq
- 9.1.10) file
- 9.1.11) tr
- 9.1.12) find
- 9.2) 文件归档和压缩
- 9.1) 使用文件
- 10) UNIX/Linux 中的编辑器
- 10.1) VI 编辑器
- 10.2) Editors – vi 快速参考指南
- 光标移动命令
- 插入文字
- 删除文本
- 更改命令
- 文件操作
- 11) UNIX 中的 Shell 编程
- 11.1) 外壳脚本
- 11.2) 引用
- 11.3) 外壳变量
- 11.4) 交互式输入
- 11.5) 函数
- 11.6) 控制命令
- 11.7) 测试控制——控制命令
- 11.8) Shell 编程——菜单脚本(为你练习)
Let’s start – DAY 1
Course Contents – DAY 1
- 1) UNIX INTRODUCTION
- 1.1) THE UNIX OPERATING SYSTEM
- 1.2) FILES AND PROCESSES
- 1.3) THE DIRECTORY STRUCTURE
- 1.4) UNIX Programs
- 2) DIRECTORY NAVIGATION & CONTROL IN UNIX
- 2.1) LISTING FILES AND DIRECTORIES
- ls
- 2.2) THE DIRECTORIES “.” AND “..”
- 2.3) WORKING WITH FILES & DIRECTORIES
- mkdir
- rmdir
- 2.1) LISTING FILES AND DIRECTORIES
- 3) FILE MAINTENANCE COMMANDS IN UNIX/LINUX
- 3.1) COPYING FILES
- cp
- 3.2) MOVING FILES
- mv
- 3.3) REMOVING FILES AND DIRECTORIES
- rm
- 3.4) FILE PERMISSIONS
- chmod
- 3.5) OWNERSHIP
- chown
- 3.6) GROUP OWNERSHIP
- chgrp
- 3.7) Make link to file
- ln
- 3.8) Update ACCESS time of file
- touch
- 3.1) COPYING FILES
- 4) DISPLAY COMMANDS IN UNIX/LINUX
- 4.1) DISPLAY A MESSAGE
- echo
- 4.2) DISPLAY A FILE
- cat
- 4.3) PAGE THROUGH A FILE
- more, less, and pg
- 4.4) DISPLAY SECTIONS OF A FILE
- head
- tail
- 4.1) DISPLAY A MESSAGE
- 5) VIEW SYSTEM RESOURCES IN UNIX/LINUX
- 5.1) SUMMARIZE DISK AND FILE USAGE
- df
- du
- 5.2) PROCESSES
- ps
- kill
- 5.3) USERS
- who
- which
- 5.4) HOSTNAME
- hostname
- script
- 5.5) DATE/TIME
- date
- 5.1) SUMMARIZE DISK AND FILE USAGE
Let’s study day 1 contents in detail with examples :
1) Unix Introduction
- Unix is an operating system originally developed in 1969 by a group of AT&T
employees at Bell Labs, including Ken Thompson, Dennis Ritchie, Douglas McIlroy,
and Joe Ossanna.
- Today’s Unix systems are split into various branches, developed over time by AT&T as
well as various commercial vendors and non-profit organizations.
- Unix operating systems are widely used in both servers and workstations.
- Unix was designed to be portable, multi-tasking and multi-user in a time-sharing
configuration.
- Unix systems are characterized by various concepts:
- the use of plain text for storing data;
- a hierarchical file system;
- treating devices and certain types of inter-process communication (IPC) as files;
- and the use of a large number of software tools, small programs that can be strung together
- through a command line interpreter using pipes, as opposed to using a single monolithic
- program that includes all of the same functionality.
- These concepts are known as the Unix philosophy.
1.1) The Unix Operating System
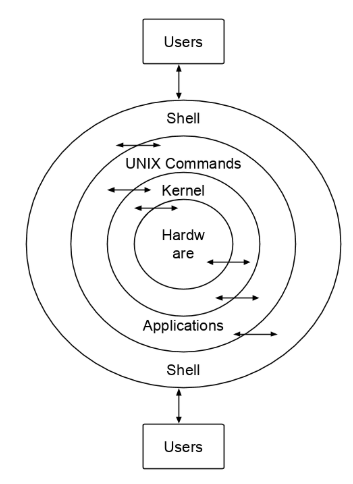
- Unix is a layered operating system. The innermost layer is the
hardware that provides the services for the OS. The operating
system, referred to in Unix as the kernel, interacts directly
with the hardware and provides the services to the user
programs. These user programs don’t need to know anything
about the hardware. They just need to know how to interact
with the kernel and it’s up to the kernel to provide the desired
service. One of the big appeals of Unix to programmers has
been that most well written user programs are independent of
the underlying hardware, making them readily portable to new
systems.
- User programs interact with the kernel through a set of
standard system calls. These system calls request services to
be provided by the kernel. Such services would include
accessing a file: open, close, read, write, link, or execute a file;
starting or updating accounting records; changing ownership of
a file or directory; changing to a new directory; creating,
suspending, or killing a process; enabling access to hardware
devices; and setting limits on system resources.
- Unix is a multi-user, multi-tasking operating system. You
can have many users logged into a system simultaneously,
each running many programs. It’s the kernel’s job to keep each
process and user separate and to regulate access to system
hardware, including cpu, memory, disk and other I/O devices.
1.2) Files and Processes
- Everything in UNIX is either a file or a process.
- A process is an executing program identified by a unique PID
(process identifier).
- A file is a collection of data. They are created by users using text
editors, running compilers etc.
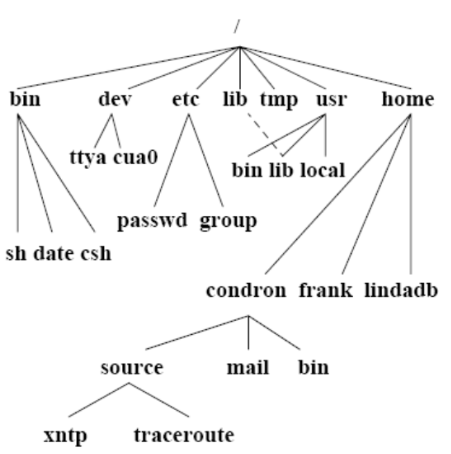
1.3) The Directory Structure
- All the files are grouped together in the directory structure. The
file-system is arranged in a hierarchical structure, like an inverted
tree. The top of the hierarchy is traditionally called root.
1.4) UNIX Programs

- A program, or command, interacts with the kernel to provide the
environment and perform the functions called for by the user. A
program can be: an executable shell file, known as a shell script; a
built-in shell command; or a source compiled, object code file.
- The shell is a command line interpreter. The user interacts with
the kernel through the shell. You can write ASCII (text) scripts to
be acted upon by a shell.
- System programs are usually binary, having been compiled from
C source code. These are located in places like /bin, /usr/bin,
/usr/local/bin, /usr/ucb, etc. They provide the functions that you
normally think of when you think of Unix. Some of these are sh,
csh, date, who, more, and there are many others.
2) Directory Navigation and Control
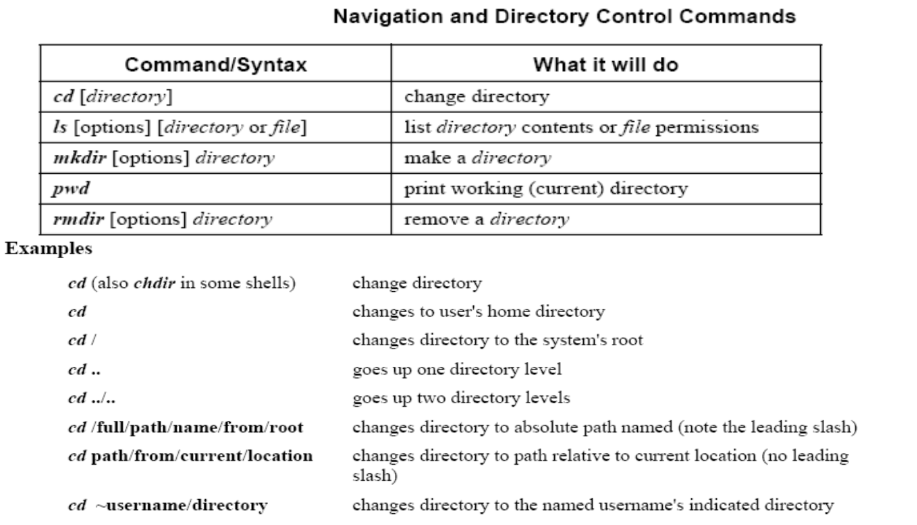
The Unix file system is set up like a tree branching out from the root. The the root directory of the system is symbolized by the forward slash (/). System and user directories are organized under the root. The user does not have a root directory in Unix; users generally log into their own home directory. Users can then create other directories under their home. The following table summarizes some directory navigation commands.
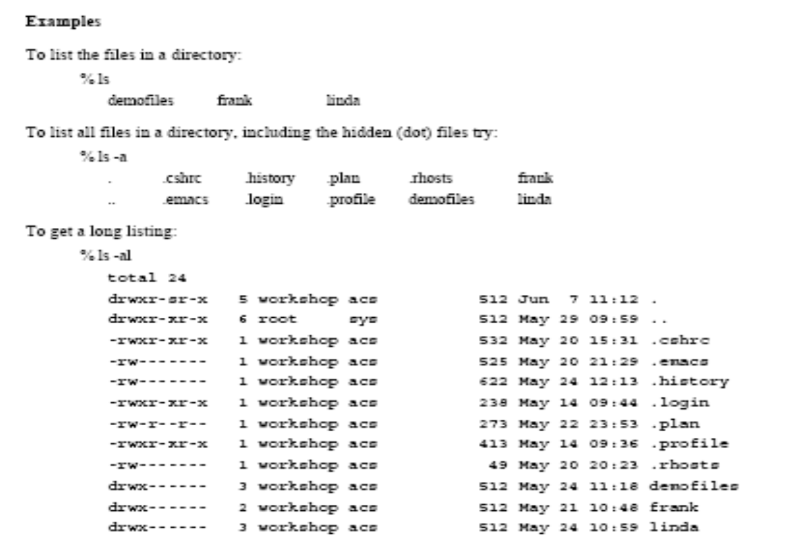
2.1) LISTING FILES AND DIRECTORIES
- The ls command:
- The command to list your directories and files is ls. With options it can provide information about the size, type of file, permissions,
dates of file creation, change and access.
Common Options:
- -a lists all files, including hidden files.
- -d lists only names of directories, not the files in the directory
- -F indicates type of entry with a trailing symbol:
- directories /
- symbolic links @
- executables *
- -g displays Unix group assigned to the file,
- -L if the file is a symbolic link, lists the information for the file or directory the link references, not the information for the link itself
- -l long listing: lists the mode, link information, owner, size, last modification (time). If the file is a symbolic link, an arrow (–>)
precedes the pathname of the linked-to file.
- The mode field is given by the -l option and consists of 10 characters. The first character is one of the following:
CHARACTER IF ENTRY IS A
d directory
– plain file
l symbolic link
- The next 9 characters are in 3 sets of 3 characters each. They indicate the file access permissions:
- the first 3 characters refer to the permissions for the user,
- the next three for the users in the Unix group assigned to the file,
- and the last 3 to the permissions for other users on the system.
- Designations are as follows:
- r read permission
- w write permission
- x execute permission
- – no permission
- ls examples >
2.2) THE DIRECTORIES “.” AND “..”
- There are two special directories
- . This refers to the present directory
- .. This refers to the parent directory
2.3) WORKING WITH FILES & DIRECTORIES
- $mkdir [-m mode] dirname…
Creates named directories in system default mode.
The standard entries in a directory (.,..) are made automatically.
Owner ID and group ID are set to the process’s real user ID and group ID respectively.
Option –m allows user to define the mode to be used for directory
Example:
$mkdir dir2
$pwd
/user/john
$cd dir2
$pwd
/user/john/dir2
$
- rmdir-remove directories
Syntax
$rmdir dirname
Directory must be empty before it can be removed.
Example:
$rmdir dir2
3) File Maintenance Commands
3.1) COPYING FILES
- cp – copy files
Syntax
$cp file1 file2
‘file1’ is copied to ‘file2’
$cp file1 file2 directory1
Files are copied into the ‘directory1’. Directory must exist before the execution of the command.
Example:
$cp test example
$cp test.c test1.c test2.c project
3.2) MOVING FILES
- mv –move or rename files or directories
Syntax
$mv [-f] file1 file2
$mv [-f] directory1 directory2
$mv [-f] file .. directory
If file2 already exists, it is removed before file1 is moved.
If file2 has a mode forbidding writing, the mode is printed and reads the standard input to find whether the move should take place or not.
Option
–f no questions are asked.
Example:
$mv test example1
$mv test.c test1.c test2.c testdir
3.3) REMOVING FILES AND DIRECTORIES
- rm – remove files or directories
Syntax
$rm [option…] file …
Removes one or more files from a directory. Removal of a file requires write permission in its directory.
Options:
Option –f force the removal of the files that do not have write permission.
Option –r recursively delete the entire contents of directories specified and the directories themselves.
Option –i interactively ask to delete each file.
Example: $rm prog1
3.4) FILE PERMISSIONS
- chmod
-change the access permissions of a file or directory
Syntax
$chmod mode file…
$chmod [who][+/-/=][permission…]file…
- Who
a all users,
g group,
o others,
u user
- +/-/=
+ add,
– remove,
= assigns
- Permission
r read,
w write,
x execute
- Model in absolute format is based on octal numbers representing the 3 kinds of access permissions.
Read 4,
Write 2,
Execute 1.
Example:
$ chmod 754 prog 1
$ chmod ug+x prog1
3.5) OWNERSHIP
- chown
– change owner ID of the files or directories
Syntax
$ chown owner file …
Owner may be a decimal user ID or a login name found in the file/etc/passwd. This utility is governed by the chown kernel
authorization. If it is not granted, Ownership can only be changed by root.
Example:
$ chown tutor test
3.6) GROUP OWNERSHIP
- chgrp
– change group ID of the files or directories
Syntax
$ chgrp group file
Group may be either a decimal group ID or a group name found in the file/etc/group. Only the owner or the superuser can change the group
ID of a file.
Example :
$ chgrp bin example
3.7) Make link to file
- ln – make a link to a file
Syntax
$ln file1 [file2…] target
A link is a directory entry to a file. Any changes to a file are effective, independent of the name by which the file is known.
Example:
$ln prog1 prog1.bat
3.8) Update ACCESS time of file
- touch
– updates access and modification times of a file
Syntax
Syntax
$ touch [-amc] [mmddhhmm[yy]] files
mm – month, dd – date, hh – hour, mm – minutes, yy –year
If no times is specified, the current time is used.
–a updates only the access time
–m updates only modification time
–c prevents creating the file if it did not exit previously
Example:
$ touch –a test.v
$ touch – m 1221101395 test.c
4) Display Commands
There are a number of commands you can use to display or view a file. Some of these are editors which we will look at later. Here we
will illustrate some of the commands normally used to display a file.
4.1) DISPLAY A MESSAGE
- echo – echo a statement
The echo command is used to repeat, or echo, the argument you give it back to the standard output device. It normally ends with a
line-feed, but you can specify an option to prevent this.
Syntax
echo [string]
Common Options
-n don’t print <new-line>
\c don’t print <new-line> (SVR4)
\n New Line
\t tab
Examples
% echo Hello Class or echo “Hello Class”
To prevent the line feed:
% echo -n Hello Class or echo “Hello Class \c”
4.2) DISPLAY A FILE
- cat – concatenate a file
Display the contents of a file with the concatenate command, cat.
Syntax
cat [options] [file]
Common Options
-n precede each line with a line number
-v display non-printing characters, except tabs, new-lines, and form-feeds
-e display $ at the end of each line (prior to new-line) (when used with -v option)
Examples
% cat filename
You can list a series of files on the command line, and cat will concatenate them, starting each in turn, immediately after
completing the previous one, e.g.:
% cat file1 file2 file3
4.3) PAGE THROUGH A FILE
- more, less – page through a file
more, less, and pg let you page through the contents
of a file one screen full at a time. These may not all be
available on your Unix system. They allow you to back
up through the previous pages and search for words,
etc.
Syntax
more [filename]
less [filename]
Internal Controls >
more displays (one screen at a time) the file requested
<space bar> to view next screen
<return> or <CR> to view one more line
q to quit viewing the file
h help
b go back up one screenful
/word search for word in the remainder of the file
less similar to more; see the man page for options
4.4) DISPLAY SECTIONS OF A FILE
- head – display the start of a file
head displays the head, or start, of the file.
Syntax
head [options] file
Common Options
-n number number of lines to display, counting from
the top of the file
-number same as above
Examples
By default head displays the first 10 lines. You can display
more with the “-n number”, or “-number” options, e.g.,
to display the first 40 lines:
% head -40 filename or head -n 40 filename
- tail – display the end of a file
tail displays the tail, or end, of the file.
Syntax
tail [options] file
Common Options
-number number of lines to display, counting from
the bottom of the file
Examples
The default is to display the last 10 lines, but you can
specify different line or byte numbers, or a different
starting point within the file. To display the last 30 lines
of a file use the -number style:
% tail -30 filename
5) System Resources
5.1) SUMMARIZE DISK AND FILE USAGE
- df – summarize disk block and file usage
df is used to report the number of disk blocks and inodes used and free for each file system. The output format and valid options are
very specific to the OS and program version in use.

Syntax
df [options] [resource]
Common Options
-l local file systems only
-k report in kilobytes
- du – report disk space in use
du reports the amount of disk space in use for the files or directories you specify.
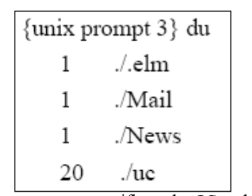
Syntax
du [options] [directory or file]
Common Options
-a display disk usage for each file, not just subdirectories
-s display a summary total only
-k report in kilobytes
5.2) PROCESSES
- ps – show status of active processes
ps is used to report on processes currently running on the system. The output format and valid options are very specific to the OS and
program version in use.
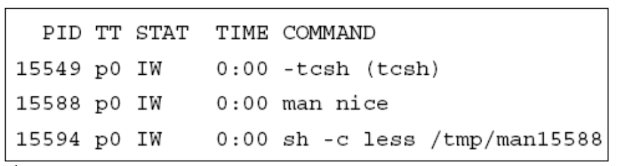
Syntax
ps [options]
Common Options
-a -e all processes, all users
-e environment/everything
-g process group leaders as well
-l -l long format
-u -u user user oriented report
-x -e even processes not executed from terminals
-f full listing
-w report first 132 characters per line
- kill – terminate a process
kill sends a signal to a process, usually to terminate it.
Syntax
kill [-signal] process-id
Common Options
-l displays the available kill signals:
Example1
{unix prompt } kill -l
HUP INT QUIT ILL TRAP IOT EMT FPE KILL
BUS SEGV SYS PIPE ALRM TERM URG STOP
TSTP CONT CHLD TTIN TTOU IO XCPU
XFSZ VTALRM PROF WINCH LOST USR1 USR2
The -KILL signal, also specified as -9 (because it is 9th
on the above list), is the most commonly used kill signal.
Once seen, it can’t be ignored by the program whereas the
other signals can.
{unix prompt 10} kill -9 15599
[1] + Killed emacs unixgrep.txt
Example 2 : start and kill background job
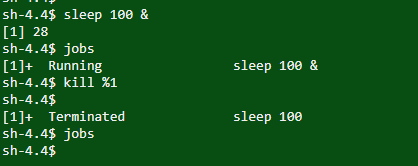
sh-4.4$ sleep 100 & start background job
[1] 28 name of job
sh-4.4$ jobs check jobs
[1]+ Running sleep 100 & (Will list all jobs running in background)
sh-4.4$ kill %1 kill background job
sh-4.4$
[1]+ Terminated sleep 100 will show job terminated above
sh-4.4$ jobs
Kill job with process id
5.3) USERS
- who – list current users
who reports who is logged in at the present time.
Syntax
who [am i]
Examples
{unix prompt } who
wmtell ttyp1 Apr 21 20:15
(apple.acs.ohio-s)
fbwalk ttyp2 Apr 21 23:21
(worf.acs.ohio-st)
{unix prompt } who am i
tgardner ttypc Apr 21 23:38
(lcondron-mac.acs)
- which – report the command found
which will report the name of the file that is be executed
when the command is invoked. This will be the full path
name or the alias that’s found first in your path.
Syntax
which command(s)
Example
{unix prompt } which Mail
/usr/ucb/Mail
5.4) HOSTNAME
- hostname/uname – name of machine
hostname (uname -n on SysV) reports the host name of
the machine the user is logged into.
uname has additional options to print information about
system hardware type and software version.
- script – record your screen I/O
script creates a script of your session input and output.
Using the script command, you can capture all the data
transmission from and to your terminal screen until you exit
the script program. This can be useful during the
programming-and-debugging process, to document the
combination of things you have tried, or to get a printed
copy of it all for later perusal.
Syntax
script [-a] [file] <. . .> exit
Common Options
-a append the output to file
You must remember to type exit to end your script session and
close your typescript file.
5.5) DATE/TIME
- date – current date and time
date displays the current data and time. A superuser can
set the date and time.
Syntax
date [options] [+format]
Common Options
+format specify the output format
%a weekday abbreviation, Sun to Sat
%h month abbreviation, Jan to Dec
%y last 2 digits of year, 00 to 99
%D MM/DD/YY date
%H hour, 00 to 23
%M minute, 00 to 59
%S second, 00 to 59
%T HH:MM:SS time
Let’s start – DAY 2
Course Contents – DAY 2
- 6) SHELLS IN UNIX
- 6.1) BUILT-IN COMMANDS
- 6.2) ENVIRONMENT VARIABLES
- 6.3) THE BOURNE SHELL
- 6.4) THE C SHELL
- 6.5) JOB CONTROL & SCHEDULING
- Job Control – BackGround Jobs
- bg
- fg
- Job Control – No Hang Up
- nohup
- Scheduling
- at
- CRONTAB
- crontab
- Job Control – BackGround Jobs
- 7) SPECIAL UNIX FEATURES IN UNIX
- 7.1) FILE DESCRIPTORS
- 7.2) FILE REDIRECTION
- 7.3) OTHER SPECIAL COMMANDS AND SYMBOLS
- 7.4) WILD CARDS
- 8) TEXT PROCESSING IN UNIX/LINUX
- 8.1) REGULAR EXPRESSION
- 8.2) TEXT PROCESSING COMMANDS
- 8.2.1) GREP
- 8.2.2) SED
- 8.2.3) AWK
Let’s study day 2 contents in detail with examples :
6) SHELLS
The shell sits between you and the operating system, acting as a command interpreter. It reads your terminal input and translates the commands into actions taken by the system.
When you log into the system you are given a default shell. When the shell starts up it reads its startup files and may set environment variables, command search paths, and command aliases, and executes any commands specified in these files.
The original shell was the Bourne shell, sh. Every Unix platform will either have the Bourne shell, or a Bourne compatible shell available. It has very good features for controlling input and output, but is not well suited for the interactive user. To meet the latter need the C shell, csh, was written and is now found on most, but not all, Unix systems. It uses C type syntax, the language Unix is written in, but has a more awkward input/output implementation. It has job control, so that you can reattach a job running in the background to the foreground.
It also provides a history feature which allows you to modify and repeat previously executed commands.
The default prompt for the Bourne shell is $ (or #, for the root user). The default prompt for the C shell is%.
Numerous other shells are available from the network. Almost all of them are based on either sh or csh with extensions to provide job control to sh, allow in-line editing of commands, page through previously executed commands, provide command name completion and custom prompt, etc. Some of the more well known of these
may be on your favorite Unix system: the Korn shell, ksh, by David Korn and the Bourne Again SHell, bash, from the Free Software Foundations GNU project, both based on sh, the T-C shell, tcsh, and the extended C shell, cshe, both based on csh. Below we will describe some of the features of sh and csh so that you can get started.
6.1) SHELLS – Built-in Commands
For the Bourne shell some of the more commonly used built-in
commands are:
. source (read and execute) commands from a file
case case conditional loop
cd change the working directory (default is $HOME)
echo write a string to standard output
eval evaluate the given arguments and feed the result back
to the shell
exec execute the given command, replacing the current
shell
exit exit the current shell
export share the specified environment variable with
subsequent shells
for for conditional loop
if if conditional loop
pwd print the current working directory
read read a line of input from stdin
set set variables for the shell
test evaluate an expression as true or false
trap trap for a typed signal and execute commands
umask set a default file permission mask for new files
unset unset shell variables
wait wait for a specified process to terminate
while while conditional loop
For the C shell the more commonly used built-in functions are:
alias assign a name to a function
bg put a job into the background
echo write a string to stdout
eval evaluate the given arguments and feed the result back to the shell
exec execute the given command, replacing the current shell
exit exit the current shell
fg bring a job to the foreground
foreach for conditional loop
history print the command history of the shell
if if conditional loop
jobs list or control active jobs
kill kill the specified process
logout terminate the login shell
nohup command do not terminate command when the shell exits
set set a shell variable
setenv set an environment variable for this and subsequent shells
source source (read and execute) commands from a file
stop stop the specified background job
switch switch conditional loop
umask set a default file permission mask for new files
unalias remove the specified alias name
unset unset shell variables
unsetenv unset shell environment variables
wait wait for all background processes to terminate
while while conditional loop
6.2) SHELLS – Environment Variables
Environmental variables are used to provide information to the programs you use. You can have both global environment and local shell variables. Global environment variables are set by your login shell and new programs and shells inherit the environment of their
parent shell. Local shell variables are used only by that shell and are not passed on to other processes. A child process cannot pass a variable back to its parent process.
The current environment variables are displayed with the “env” or “printenv” commands. Some common ones are:
• DISPLAY The graphical display to use, e.g. nyssa:0.0
• EDITOR The path to your default editor, e.g. /usr/bin/vi
• HOME Path to your home directory, e.g. /home/frank
• HOST The hostname of your system, e.g. nyssa
• PATH Paths to be searched for commands, e.g. /usr/bin:/usr/ucb:/usr/local/bin
• PS1 The primary prompt string, Bourne shell only (defaults to $)
• PS2 The secondary prompt string, Bourne shell only (defaults to >)
• SHELL The login shell you’re using, e.g. /usr/bin/csh
• TERM Your terminal type, e.g. xterm
• USER Your username, e.g. frank
Many environment variables will be set automatically when you login. You can modify them or define others with entries in your startup
files or at anytime within the shell. Some variables you might want to change are PATH and DISPLAY. The PATH variable specifies the directories to be automatically searched for the command you specify.
You set a global environment variable with a command similar to the following for the C shell:
% setenv NAME value
and for Bourne shell:
$ NAME=value; export NAME
You can list your global environmental variables with the env or printenv commands. You unset them with the unsetenv (C shell) or unset (Bourne shell) commands.
To set a local shell variable use the set command with the syntax below for C shell. Without options set displays all the local variables.
% set name=value
For the Bourne shell set the variable with the syntax:
$ name=value
The current value of the variable is accessed via the “$name“, or “${name}“, notation.
6.3) SHELLS – The Bourne Shell, sh
Sh uses the startup file .profile in your home directory. There may also be a
system-wide startup file, e.g. /etc/profile. If so, the system-wide one will be
sourced (executed) before your local one.
Whenever a # symbol is encountered the remainder of that line is treated as a
comment.
In the PATH variable each directory is separated by a colon (:) and the dot (.)
specifies that the current directory is in your path. If the latter is not set it’s a
simple matter to execute a program in the current directory by typing:
./program_name
A variable set in .profile is set only in the login shell unless you “export” it or source
.profile from another shell. In the example PATH is exported to any subshells.
You can source a file with the built-in “.” command of sh, i.e.:
. ./.profile
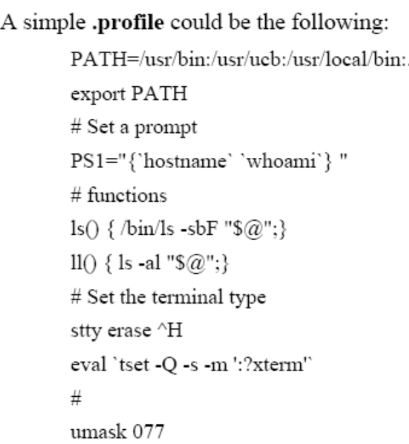
You can make your own functions. In the example the function ll results in an “ls -al”
being done on the specified files or directories.
With stty the erase character is set to Control-H (^H), which is usually the Backspace
key.
The tset command prompts for the terminal type, and assumes “xterm” if we just hit
<CR>. This command is run with the shell built-in, eval, which takes the result
from the tset command and uses it as an argument for the shell. In this case the
“-s” option to tset sets the TERM and TERMCAP variables and exports them.
The last line in the example runs the umask command with the option such that any
files or directories you create will not have read/write/execute permission for
group and other.
For further information about sh type “man sh” at the shell prompt.
6.4) SHELLS – The C Shell, csh
Csh uses the startup files .cshrc and .login. Some versions use a system-wide startup
file, example = /etc/csh.login.
Your .login file is sourced (executed) only when you login.
Your .cshrc file is sourced every time you start a csh, including when you login. It
has many similar features to .profile, but a different style of doing things. Here
we use the set or setenv commands to initialize a variable, where set is used for
this shell and setenv for this and any subshells. The environment variables:
USER, TERM, and PATH, are automatically imported to and exported from
the user, term, and path variables of the csh. So setenv doesn’t need to be
done for these. The C shell uses the symbol, ~, to indicate the user’s home
directory in a path, as in ~/.cshrc, or to specify another user’s login directory, as
in ~username/.cshrc.
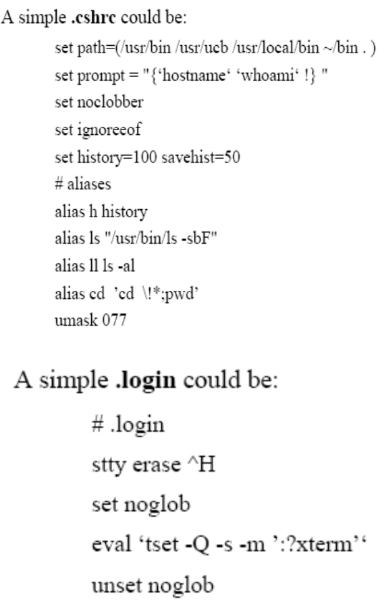
Few predefined variables used by the C shell include:
• argv The list of arguments of the current shell
• history Sets the size of the history list to save
• home The home directory of the user; starts with $HOME
• path The command search path; starts with $PATH
• prompt Set the command line prompt (default is %)
• savehist number of lines to save in the history list to save in the .history
file
• shell The full pathname of the current shell; starts with $SHELL
• term Your terminal type, starts with $TERM
• user Your username, starts with $USER
An alias allows you to use the specified alias name instead of the full command. In
the “ls” example, typing “ls” will result in “/usr/bin/ls -sbF” being executed.
You can tell which “ls” command is in your path with the built-in which
command, i.e.:
which ls
ls: aliased to /usr/bin/ls -sbF
Should you make any changes to your startup files you can initiate the change by
sourcing the changed file. For csh you do this with the built-in source
command, i.e.:
source .cshrc
6.5) SHELLS – Job Control & Scheduling
6.5.1) Job Control – Background Jobs in unix/linux
You can put jobs into the background at anytime by appending “&” to the command. After submitting a command you can also do this by typing ^Z (Control-Z)
to suspend the job and then “bg” to put it into the background. To bring it back to the foreground type “fg“. You can have many jobs running in the
background. When they are in the background they are no longer connected to the keyboard for input, but they may still display output to the terminal,
interspersing with whatever else is typed or displayed by your current job. You may want to redirect I/O to or from files for the job you intend to
background. Your keyboard is connected only to the current, foreground, job. The built-in jobs command allow you to list your background jobs. You can
use the kill command to kill a background job.
bg example >
background job

Let’s discuss above diagram in detail >
Strat job and then use bg to see background jobs (It will show suspended jobs as well)
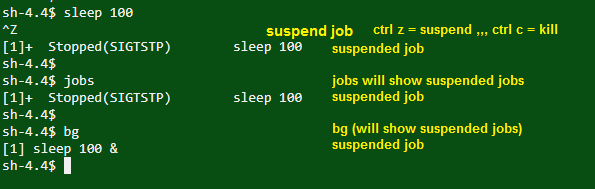
fg example >
foreground job

Let’s discuss above diagram in detail >
Start and foreground job
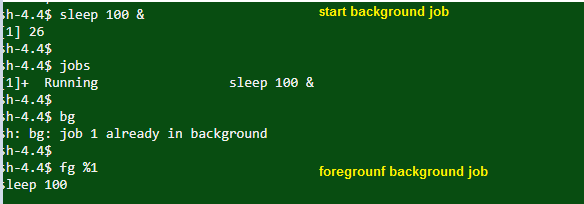
How to start, suspend jobs? How to see jobs? How to put them in background or foreground them?
We will do this in below diagram.
Start, suspend (ctrl+z), see jobs, use bg, fg

6.5.2) Job Control – No Hang Up in unix/linux
The background jobs are dependent on the life of the terminal from where they have been initiated. However, if you wish to keep the background job running
even if the terminal is terminated, you will have to use the “nohup” command. Following is the syntax of the “nohup” command :-
nohup YourProgram.sh &
6.5.3) Scheduling in unix/linux
AT – executes commands at a specified time.
at [-c | -k | -s] [-f filename] [-q queuename] [-m] -t time [date] [-l] [-r]
-c, -k, -s Defines the shell to be used to execute the at-job.. C shell. csh/Korn shell. ksh/Bourne shell. Sh
-f filename Specifies the file that contains the command to run.
-m Sends mail once the command has been run.
-t time Specifies at what time you want the command to be ran.
– date Specifies the date you wish it to be ran on.
-l Lists the commands that have been set to run.
-r Cancels the command that you have set in the past.
6.5.4) CRONTAB in unix/linux
If you want to execute a program on a regular schedule, crontab is the best solution. The crontab is user and server specific. The cron daemon is the
system’s main scheduler for running unattended jobs or tasks. The cron daemon starts when the system boots up and continuously runs in the background. It then
reads the crontab files and regularly executes commands at specified times. The crontab file allows users to submit, edit or delete entries to cron.
Syntax: crontab [-e] [-l] [-r] [filename]
Common options :
-e edit a copy of the current user’s crontab file, or creates an empty file to edit if crontab does not exist. When editing is complete, the file is installed as the
user’s crontab file.
-l list the entries in the crontab file for the invoking user.
-r remove a user’s crontab from the crontab filename
The filename that contains the commands to run.
Example:
minute hour day-of-month month-of-year day-of-week command
15 12 14 2 * mailx john%Happy Birthday!%Time for lunch.
* Is treated as a wild card.
If you want the command to run on the 15th, 30th and 45th min of an hour, please specify 15,30,45.
If you want the command to run every hour between 06:00 and 10:00, please specify 06-10.
The days of the week start from 0 through 6, where 0 is the Sunday.
7) UNIX SPECIAL FEATURES
7.1) File Descriptors in unix/linux
There are 3 standard file descriptors:
• stdin 0 Standard input to the program
• stdout 1 Standard output from the program
• stderr 2 Standard error output from the program
Normally input is from the keyboard or a file. Output, both stdout and stderr, normally go to the terminal, but you can redirect one or
both of these to one or more files. You can also specify additional file descriptors, designating them by a number 3 through 9, and
redirect I/O through them.
7.2) File Redirection in unix/linux
Output redirection takes the output of a command and places it into a named file. Input redirection reads the file as input to the command. The following summarizes the redirection options.
Symbol Redirection
> output redirect
>! same as above, but overrides noclobber option of csh
>> append output
>>! same as above, but overrides noclobber option on csh and creates the file if it doesn’t already exist.
| pipe output to another command
< input redirection
<<String read from standard input until “String” is encountered as the only thing on the line. Also known as a “here document”
<<\String same as above, but don’t allow shell substitutions
Examples :
Output redirection:
cat file1 file2 > file3
Output is appended to a file in the form:
cat file1 >> file2
Input is redirected from a file in the form:
program < file
To pipe output to another command use the form:
command | command
Redirect standard output to one file and standard error to another file :
command 1> out_file 2> err_file
Redirect standard error to standard output:
command > file 2>&1
7.3) Other Special Command Symbols in unix/linux
; command separator
& run the command in the background
&& run the command following this only if the previous command completes successfully
|| run the command following only if the previous command did not complete successfully
( ) the commands within the parentheses are executed in a subshell.
’ ’ literal quotation marks. Don’t allow any special meaning to any characters within these quotations.
\ escape the following character (take it literally)
” “ regular quotation marks. Allow variable and command substitution with theses quotations (does not disable $ and \ within the string).
# everything following until <newline> is a comment
7.4) Wild Cards in unix/linux
The shell and some text processing programs will allow meta-characters, or wild cards, and replace them with pattern matches. For
filenames these meta-characters and their uses are:
? match any single character at the indicated position
* match any string of zero or more characters
[abc…] match any of the enclosed characters
[a-e] match any characters in the range a,b,c,d,e
[!def] match any characters not one of the enclosed characters, sh only
{abc,bcd,cde} match any set of characters separated by comma (,) (no spaces), csh only
~ home directory of the current user, csh only
~user home directory of the specified user, csh only
8) TEXT PROCESSING IN UNIX/LINUX
8.1) Text Processing – Regular Expressions in unix/linux
Some text processing programs, such as grep, egrep, sed, awk and vi, let you search on patterns instead of fixed strings. These text patterns are known as regular expressions. You form a regular expression by combining normal characters and special characters, also
known as meta-characters, with the rules below. With these regular expressions you can do pattern matching on text data. Regular expressions come in three different forms:
• Anchors which tie the pattern to a location on the line
• Character sets which match a character at a single position
• Modifiers which specify how many times to repeat the previous expression
Regular expression syntax is as follows. Some programs will accept all of these, others may only accept some.
. match any single character except <newline>
* match zero or more instances of the single character (or meta-character) immediately preceding it
[abc] match any of the characters enclosed
[a-d] match any character in the enclosed range
[^exp] match any character not in the following expression
^abc the regular expression must start at the beginning of the line (Anchor)
abc$ the regular expression must end at the end of the line (Anchor)
\ treat the next character literally. This is normally used to escape the meaning of special characters such as “.” and “*”.
\{n,m\} match the regular expression preceding this a minimum number of n times and a maximum of m times (0 through 255 are allowed for n and m).
\<abc\> will match the enclosed regular expression as long as it is a separate word.
\(abc\) saves the enclosed pattern in a buffer. Up to nine patterns can be saved for each line.
\n where n is between 1 and 9. This matches the nth expression previously saved for this line. Expressions are numbered starting from the left. The \n should be thought of as a single operator.
& print the previous search pattern (used in the replacement string)
There are a few meta-characters used only by awk and egrep :
+ match one or more of the preceding expression
? match zero or more of the preceding expression
| separator. Match either the preceding or following expression.
( ) group the regular expressions within and apply the match to the set.
8.2) TEXT PROCESSING COMMANDS in unix/linux
8.2.1) Text Processing – GREP in unix/linux
The grep utility is used to search for generalized regular expressions occurring in Unix files. Regular expressions, such as those shown above, are best specified in apostrophes (or single quotes) when specified in the grep utility. The egrep
utility provides searching capability using an extended set of meta-characters. The syntax of the grep utility, some of
the available options, and a few examples are shown below.
Syntax
grep [options] regexp [file[s]]
Common Options
-i ignore case
-c report only a count of the number of lines containing matches, not the matches themselves
-v invert the search, displaying only lines that do not match
-n display the line number along with the line on which a match was found
-s work silently, reporting only the final status:
0 for match(es) found
1 for no matches
2 for errors
-l list filenames, but not lines, in which matches were found
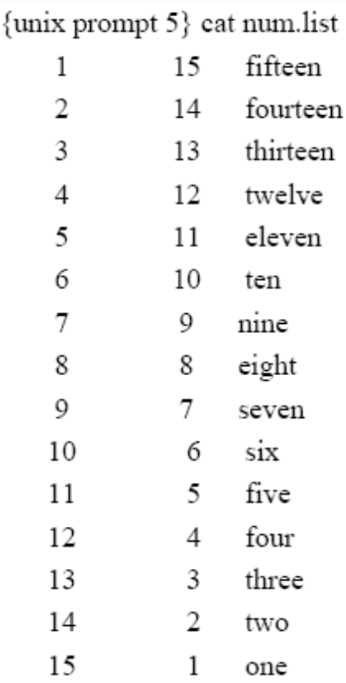
Here are some grep examples using this file.
In the first we’ll search for the number 15:
{unix prompt} grep ’15’ num.list
1 15 fifteen
15 1 one
Now we’ll use the “-c” option to count the number of lines matching the search criterion:
{unix prompt 7} grep -c ’15’ num.list
2
Here we’ll be a little more general in our search, selecting for all lines containing the character 1
followed by either of 1, 2 or 5:
{unix prompt 8} grep ‘1[125]’ num.list
1 15 fifteen
4 12 twelve
5 11 eleven
11 5 five
12 4 four
15 1 one
Now we’ll search for all lines that begin with a space:
{unix prompt 9} grep ‘^ ‘ num.list
1 15 fifteen
2 14 fourteen
3 13 thirteen
4 12 twelve
5 11 eleven
6 10 ten
7 9 nine
8 8 eight
9 7 seven
Or all lines that don’t begin with a space:
{unix prompt 11} grep -v ‘^ ‘ num.list
10 6 six
11 5 five
12 4 four
13 3 three
14 2 two
15 1 one
8.2.2) Text Processing – SED in unix/linux
The non-interactive, stream editor, sed, edits the input stream, line by line, making the specified changes, and sends the result to standard output.
Syntax
sed [options] edit_command [file]
Substitution functions allow context searches and are specified in the form:
s/regular_expression_pattern/replacement_string/flag.
They should be quoted with single quotes (’) if additional options or functions are specified. These special characters can be escaped with a
backslash (\) to remove their special meaning.
Common Options
-e script edit script
-n don’t print the default output, but only those lines specified by p or s///p functions
-f script_file take the edit scripts from the file, script_file
Valid flags on the substitution functions include:
d delete the pattern
g globally substitute the pattern
p print the line
Examples :
This example changes all incidents of a comma (,) into a comma followed by a space (, ) when doing output:
% cat filey | sed s/,/,\ /g
The following example removes all incidents of Jr preceded by a space ( Jr) in filey:
% cat filey | sed s/\ Jr//g
To perform multiple operations on the input precede each operation with the -e (edit) option and quote the strings. For example, to filter for
lines containing “Date: ” and “From: ” and replace these without the colon (:), try:
sed -e ’s/Date: /Date /’ -e ’s/From: /From /’
To print only those lines of the file from the one beginning with “Date:” up to, and including, the one beginning with “Name:” try:
sed -n ’/^Date:/,/^Name:/p’
To print only the first 10 lines of the input (a replacement for head):
sed -n 1,10p
8.2.3) Text Processing – AWK in unix/linux
awk is a pattern scanning and processing language. It is used as advanced filter. Its name comes from the last initials of the three authors:
Alfred. V. Aho, Brian. W. Kernighan, and Peter. J. Weinberger. nawk is new awk, a newer version of the program, and gawk is gnu
awk, from the Free Software Foundation. Each version is a little different. Here we’ll confine ourselves to simple examples which
should be the same for all versions. On some OSs awk is really nawk.
Input is divided into records and fields. The default record separator is <newline>. Separators can also be changed to any single character,
as desired. $n, where n is an integer, is used to represent the nth field of the input record, while $0 represents the entire input record.
Printing is allowed through the print, and formatted print, printf, statements.
Let’s start with a file, words.data, that contains these lines:
nail hammer wood
pedal foot car
clown pie circus
You can use the print function in awk to plug the words from each input line into a template:
awk ‘{print “Hit the”,$1,”with your”,$2}’ words.data
Hit the nail with your hammer
Hit the pedal with your foot
Hit the clown with your pie
You can search for a pattern:
awk /^clown/'{printf (“See the %s at the %s”,$1,$3) }’ words.data
See the clown at the circus
Say some of the data in your input file is numeric, as in the grades.data file shown here:
Rogers|87|100|95
Lambchop|66|89|76
Barney|12|36|27
You can perform calculations like this:
awk –F”|” ‘{print “Avg for”,$1,”is”,($2+$3+$4)/3}’ grades.data
Avg for Rogers is 94
Avg for Lambchop is 77
Avg for Barney is 25
Let’s start – DAY 3
Course Contents – DAY 3
- 9) OTHER USEFUL COMMANDS IN UNIX/LINUX
- 9.1) WORKING WITH FILES
- 9.1.1) cmp
- 9.1.2) diff
- 9.1.3) cut
- 9.1.4) touch
- 9.1.5) wc
- 9.1.6) ln
- 9.1.7) sort
- 9.1.8) tee
- 9.1.9) uniq
- 9.1.10) file
- 9.1.11) tr
- 9.1.12) find
- 9.2) FILE ARCHIVING & COMPRESSION
- 9.1) WORKING WITH FILES
- 10) EDITORS IN UNIX/LINUX
- 10.1) VI EDITOR
- 10.2) Editors – vi Quick Reference Guide
- Cursor movements command
- Inserting text
- Deleting text
- Change command
- File Manipulation
- 11) SHELL PROGRAMMING IN UNIX
- 11.1) SHELL SCRIPTS
- 11.2) QUOTING
- 11.3) Shell VARIABLES
- 11.4) INTERACTIVE INPUT
- 11.5) FUNCTIONS
- 11.6) CONTROL COMMANDS
- 11.7) TEST CONTROLS – CONTROL COMMANDS
- 11.8) Shell Programming – Menu Script (Exercise for you)
Let’s study day 3 contents in detail with examples :
9) OTHER USEFUL COMMANDS IN UNIX/LINUX
9.1) WORKING WITH FILES
- 9.1.1) cmp – compare file contents
The cmp command compares two files, and
(without options) reports the location of the
first difference between them. It can deal with
both binary and ASCII file comparisons. It
does a byte-by-byte comparison.
Syntax
cmp [options] file1 file2
Common Options
-l report on each difference
-s report exit status only, not byte differences
Example

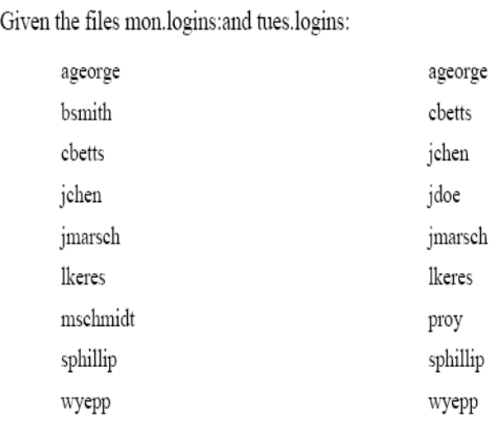
Output of
% cmp mon.logins tues.logins

- 9.1.2) diff – differences in files
The diff command compares two files, directories, etc, and reports all
differences between the two. It deals only with ASCII files. It’s
output format is designed to report the changes necessary to convert
the first file into the second.
Syntax
diff [options] file1 file2
Common Options
-b ignore trailing blanks
-i ignore the case of letters
-w ignore <space> and <tab> characters
-e produce an output formatted for use with the editor, ed
-r apply diff recursively through common sub-directories
The output lists the differences as well as in which file the difference
exists. Lines in the first file are preceded by “< “, and those in the
second file are preceded by “> “.
Example
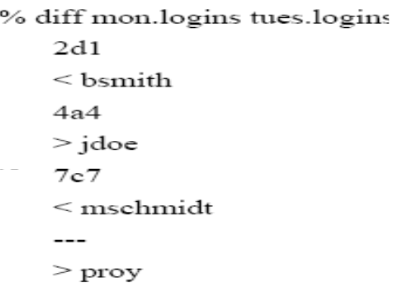
Output of
% diff mon.logins tues.logins
- 9.1.3) cut – select parts of a line
The cut command allows a portion of a file to be extracted for another use.
Syntax
cut [options] file
Common Options
-c character_list character positions to select (first character is 1)
-d delimiter field delimiter (defaults to <TAB>)
-f field_list fields to select (first field is 1)
Both the character and field lists may contain comma-separated or blank-character-separated numbers (in increasing
order), and may contain a hyphen (-) to indicate a range. Any numbers missing at either before (e.g. -5) or after
(e.g. 5-) the hyphen indicates the full range starting with the first, or ending with the last character or field,
respectively. Blank-character-separated lists must be enclosed in quotes. The field delimiter should be enclosed
in quotes if it has special meaning to the shell, e.g. when specifying a <space> or <TAB> character.
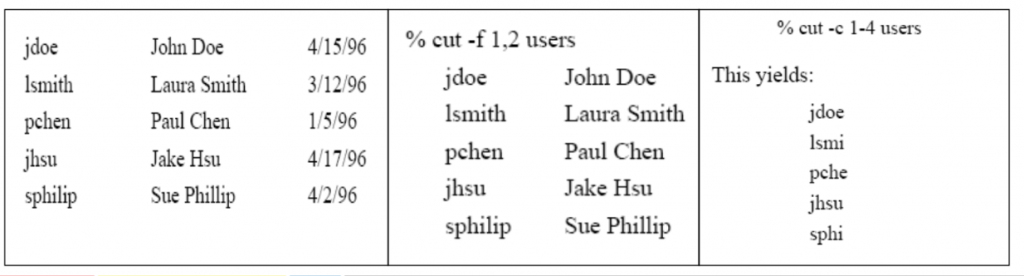
Examples :
cut -f 1,2 users cut -c 1-4 users
- 9.1.4) touch – create a file
The touch command can be used to create a new (empty) file or to update the last access date/time on an existing file. The command is used primarily
when a script requires the pre-existence of a file (for example, to which to append information) or when the script is checking for last date or
time a function was performed.
- 9.1.5) wc – count words in a file
wc stands for “word count”; the command can be used to count the number of lines, characters, or words in a file.
Syntax
wc [options] file
Common Options
-c count bytes
-m count characters (SVR4)
-l count lines
-w count words
- 9.1.6) ln – link to another file
The ln command creates a “link” or an additional way to access (or gives an additional name to) another file.
Syntax
ln [options] source [target]
If not specified target defaults to a file of the same name in the present working directory.
Common Options
-f force a link regardless of target permissions; don’t report errors (SVR4 only)
-s make a symbolic link
A symbolic link is used to create a new path to another file or directory. A symbolic link would be done in the following way:
% ln -s chkit chkmag
The long listing for these two files is now as follows:
16 -rwxr-x— 1 lindadb acs 15927 Apr 23 04:10 chkit
1 lrwxrwxrwx 1 lindadb acs 5 Apr 23 04:11 chkmag -> chkit
A hard link can only be done to another file on the same file system, but not to a directory. A hard link creates a new directory entry pointing to the
same inode as the original file. The file linked to must exist before the hard link can be created. The file will not be deleted until all the hard
links to it are removed. To link the two files above with a hard link to each other do:
% ln chkit chkmag
Then a long listing shows that the inode number (742) is the same for each:
% ls -il chkit chkmag
742 -rwxr-x— 2 lindadb acs 15927 Apr 23 04:10 chkit
742 -rwxr-x— 2 lindadb acs 15927 Apr 23 04:10 chkmag
- 9.1.7) sort – sort file contents
The sort command is used to order the lines of a file. Various options can be
used to choose the order as well as the field on which a file is sorted. Without any options, the sort compares entire lines in the file and outputs them in ASCII order (numbers first, upper case letters, then lower case letters).
Common Options
-b ignore leading blanks (<space> & <tab>) when determining
starting and ending characters for the sort key
-i ignore non-printable characters
-n numeric sort
-o outfile output file
-r reverse the sort
-u unique; omit multiple copies of the same line (after the sort)
- 9.1.8) tee – copy command output
tee command sends standard in to specified files and also to standard out. It’s often used
in command pipelines.
Syntax
tee [options] [file[s]]
Common Options
-a append the output to the files
-i ignore interrupts
- 9.1.9) uniq – remove duplicate lines
uniq command filters duplicate adjacent lines from a file.
Syntax
uniq [options] [+|-n] file [file.new]
Common Options
-d one copy of only the repeated lines
-u select only the lines not repeated
+n ignore the first n characters
-n skip the first n fields, including any blanks (<space> & <tab>)
- 9.1.10) file – file type
This command, file, examines the selected file and tries to determine
what type of file it is. It does this by reading the first few bytes of
the file and comparing them with the table in /etc/magic. It can
determine ASCII text files, tar formatted files, compressed files,
etc.
Syntax
file [options] [-m magic_file] [-f file_list] file
Common Options
-c check the magic file for errors in format
-f file_list file_list contains a list of files to examine
-h don’t follow symbolic links (SVR4 only)
-L follow symbolic links (BSD only)
-m magic_file use magic_file as the magic file instead of
/etc/magic
- 9.1.11) tr – translate characters
The tr command translates characters from stdin to stdout.
Syntax
tr [options] string1 [string2]
Common Options
-c complement the character set in string1
-d delete the characters in string1
-s squeeze a string of repeated characters in string1 to a single character
- 9.1.12) find – find files
The find command will recursively search the indicated directory tree to find files matching a type or pattern you specify. find can then list the files
or execute arbitrary commands based on the results.
Syntax
find directory [search options] [actions]
Common Options
For the time search options the notation in days, n is:
+n more than n days
n exactly n days
-n less than n days
Some file characteristics that find can search for are:
time that the file was last accessed or changed
-atime n access time, true if accessed n days ago
-ctime n change time, true if the files status was changed n days ago
-mtime n modified time, true if the files data was modified n days ago
-newer filename true if newer than filename
-type type type of file, where type can be:
d directory
l symbolic link
f regular file
-fstype type type of file system, where type can be any valid file system type, e.g.: ufs (Unix File System) and nfs (Network File System)
-user username true if the file belongs to the user username
-group groupname true if the file belongs to the group groupname
-exec command execute command. The end of command is indicated by and escaped semicolon (\;). The command argument, {}, replaces
the current path name.
-name filename true if the file is named filename. Wildcard pattern matches are allowed if the meta-character is escaped from the shell with a backslash (\).
-ls always true. It prints a long listing of the current pathname.
-print print the pathnames found
9.2) File Archiving and Compression in UNIX/LINUX
File Compression
- 9.2.1) The compress command is used to reduce the amount of disk space utilized by a file. When a file has been compressed using the
compress command, a suffix of .Z is appended to the file name. The ownership modes and access and modification times of the
original file are preserved. uncompress restores the files originally compressed by compress.
Syntax
compress [options] [file]
uncompress [options] [file.Z]
zcat [file.Z]
Common Options
-c write to standard output and don’t create or change any files
-f force compression of a file, even if it doesn’t reduce the size of the file or if the target file (file.Z) already exists.
-v verbose. Report on the percentage reduction for the file.
zcat writes to standard output. It is equivalent to “uncompress -c”.
- 9.2.2) gzip is also can be used instead of compress. The file extension will be .gz .
gunzip is used to uncompress the file.
- 9.2.3) tar – archive files
The tar command combines files into one device or filename for archiving purposes. The tar command does not compress the files; it
merely makes a large quantity of files more manageable.
Syntax
tar [options] [directory file]
Common Options
c create an archive (begin writting at the start of the file)
t table of contents list
x extract from an archive
v verbose
f archive file name
b archive block size
tar will accept its options either with or without a preceding hyphen (-). The archive file can be a disk file, a tape device, or standard
input/output. The latter are represented by a hyphen.
10) Editors
10.1) VI EDITOR
There are numerous text processing utilities available with Unix, as is noted throughout this document (e.g., ed, ex, sed, awk, etc.). Among
the editors, the standard “visual” (or fullscreen) editor on Unix is vi.
Vi is a modal editor. This means that it has specific modes that allow text insertion, text deletion, and command entering. You leave the
insert mode by typing the <escape> key. This brings you back to command mode. There is also a read-only mode of vi, which you
can invoke as view.
Another editor that is common on Unix systems, especially in college and university environments, is emacs (which stands for “editing
macros”). While vi usually comes with the Unix operating system, emacs usually does not. It is distributed by The Free Software
Foundation. It is arguably the most powerful editor available for Unix. It is also a very large software system, and is a heavy user of
computer system resources.
Configuring Your vi Session
To configure the vi environment certain options can be set with the line editor command :set during a vi editing session. Alternatively,
frequently used options can be set automatically when vi is invoked, by use of the .exrc file. This file can also contain macros to map
keystrokes into functions using the map function. Within vi these macros can be defined with the :map command. Control characters
can be inserted by first typing <control>-V (^V), then the desired control character. The options available in vi include, but are not
limited to, the following.
Some options are not available on every Unix system.
:set all display all option settings
:set ignorecase ignore the case of a character in a search
:set list display tabs and carriage returns
:set nolist turn off list option
:set number display line numbers
:set nonumber turn off line numbers
:set showmode display indication that insert mode is on
:set noshowmode turn off showmode option
:set wrapmargin=n turn on word-wrap n spaces from the right margin
:set wrapmargin=0 turn off wrapmargin option
:set warn display “No write since last change”
:set nowarn turn off “write” warning
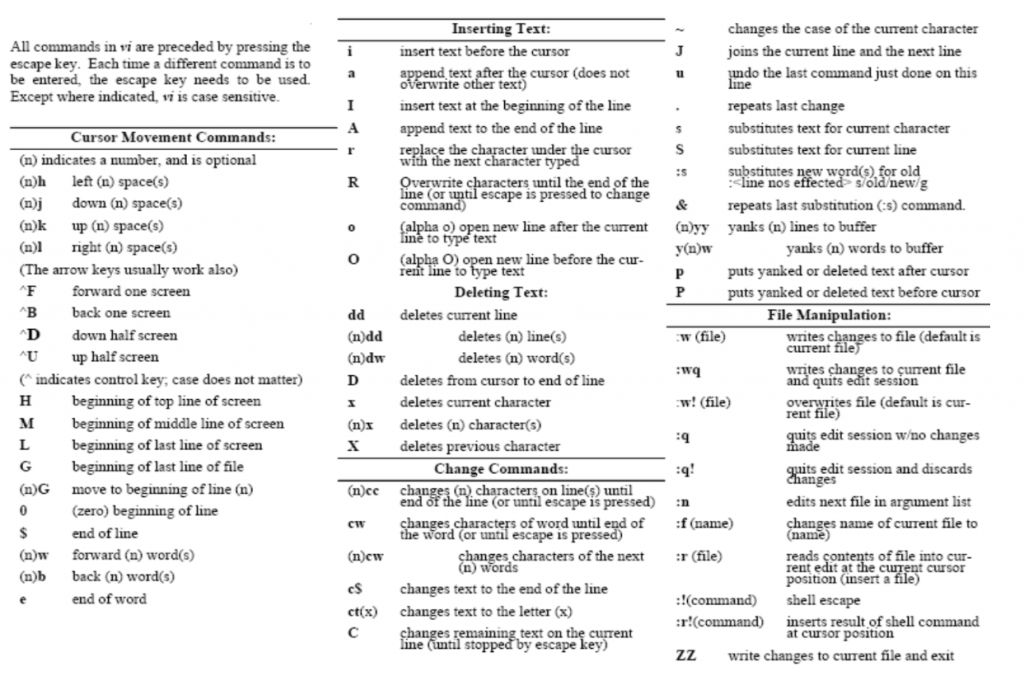
10.2) Editors – vi Quick Reference Guide
- Cursor movements command
- Inserting text
- Deleting text
- Change command
- File Manipulation
11) Shell Programming – Shell Scripts
11.1) SHELL SCRIPTS
Shell Scripts
You can write shell programs by creating scripts containing a series of shell commands. The first line of the script should start with #!
which indicates to the kernel that the script is directly executable. You immediately follow this with the name of the shell, or program
(spaces are allowed), to execute, using the full path name. Generally you can count on having up to 32 characters, possibly more on
some systems, and can include one option.
So to set up a Bourne shell script the first line would be:
#! /bin/sh
or for the C shell:
#! /bin/csh -f
You also need to specify that the script is executable by setting the proper bits on the file with chmod, e.g.: % chmod +x shell_script
Within the scripts # indicates a comment from that point until the end of the line, with #! being a special case if found as the first characters
of the file.
Setting Parameter Values
Parameter values, e.g. param, are assigned as:
Bourne shell C shell
param=value set param = value
11.2) QUOTING
We quote strings to control the way the shell interprets any parameters or variables within the string. We can use single (’) and double (“)
quotes around strings. Double quotes define the string, but allow variable substitution.
Single quotes define the string and prevent
variable substitution. A backslash (\) before a character is said to escape it, meaning that the system should take the character
literally, without assigning any special meaning to it. These quoting techniques can be used to separate a variable from a fixed string.
As an example let’s use the variable, var, that has been assigned the value bat, and the constant string, man. If I wanted to combine these to
get the result “batman” I might try: $varman
but this will not work, because the shell will be trying to evaluate a variable called varman, which doesn’t exist. To get the desired result
we need to separate it by quoting, or by isolating the variable with curly braces ({}), as in:
“$var”man – quote the variable
$var””man – separate the parameters
$var”man” – quote the constant
$var”man – separate the parameters
$var’man’ – quote the constant
$var\man – separate the parameters
${var}man – isolate the variable
These all work because “, ’, \, {, and } are not valid characters in a variable name.
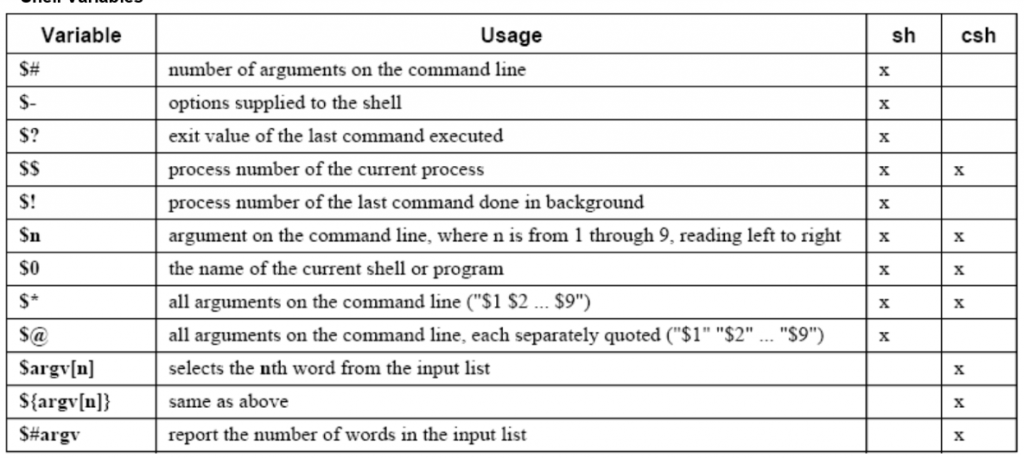
11.3) Shell VARIABLES – Shell Programming
11.4) INTERACTIVE INPUT – Shell Programming
Shell scripts will accept interactive input to set parameters within the script.
Sh
Sh uses the built-in command, read, to read in a line, e.g.:
read param
We can illustrate this with the simple script:
#!/bin/sh
echo “Input a phrase \c” # This is /bin/echo which requires “\c” to prevent <newline>
read param
echo param=$param
When we run this script it prompts for input and then echoes the results:
$ ./read.sh
Input a phrase hello frank # I type in hello frank <return>
param=hello frank
Csh
Csh uses the $< symbol to read a line from stdin, e.g.: set param = $<
The spaces around the equal sign are important. The following script illustrates how to use this.
#!/bin/csh -f
echo -n “Input a phrase ” # This built-in echo requires -n to prevent <newline>
set param = $<
echo param=$param
Again, it prompts for input and echoes the results:
% ./read.csh
Input a phrase hello frank # I type in hello frank <return>
param=hello frank
11.5) FUNCTIONS -Shell Programming
Functions
The Bourne shell has functions. These are somewhat similar to aliases in the C shell, but allow you more flexibility. A function has the form:
fcn () { command; }
where the space after {, and the semicolon (;) are both required; the latter can be dispensed with if a <newline> precedes the }. Additional
spaces and <newline>’s are allowed.
Example : ls() { /bin/ls -sbF “$@”;}
This function redefines ls so that the options -sbF are always supplied to the standard /bin/ls command, and acts on the supplied input,
“$@”.
Functions are very useful in shell scripts.
| #!/bin/sh# Cron script to do a complete backup of the systemHOST=`/bin/uname -n`admin=frankMt=/bin/mtDump=/usr/sbin/ufsdumpMail=/bin/mailxdevice=/dev/rmt/0nRewind=”$Mt -f $device rewind”Offline=”$Mt -f $device rewoffl”# Failure – exitfailure () {$Mail -s “Backup Failure – $HOST” $admin << EOF_failure$HOSTCron backup script failed.EOF_failureexit 1} |
| # Dump failure – exitdumpfail () {$Mail -s “Backup Failure – $HOST” $admin << EOF_dumpfail$HOSTCron backup script failed. Initial tape access was okay, but dump failed.EOF_dumpfailexit 1}# Successsuccess () {$Mail -s “Backup completed successfully – $HOST” $admin << EOF_success$HOSTCron backup script was apparently successful. The /etc/dumpdates file is:`/bin/cat /etc/dumpdates`EOF_success}# Confirm that the tape is in the device$Rewind || failure$Dump 0uf $device / || dumpfail$Dump 0uf $device /usr || dumpfail$Dump 0uf $device /home || dumpfail$Dump 0uf $device /var || dumpfail($Dump 0uf $device /var/spool/mail || dumpfail) && success$Offline |
11.6) CONTROL COMMANDS -Shell Programming
Control Commands
11.6.1) Conditional if
The conditional if statement is available in both shells, but has a different syntax in each.
The conditions to be tested for are usually done with the test, or [] command. The if and then must be separated, either with a <newline> or a semicolon (;).
#!/bin/sh
if [ $# -ge 2 ]
then
echo $2
elif [ $# -eq 1 ]; then
echo $1
else
echo No input
fi
#!/bin/csh -f
if ( $#argv >= 2 ) then
echo $2
else if ( $#argv == 1 ) then
echo $1
else
echo No input
endif
11.6.2) Conditional switch and case
To choose between a set of string values for a parameter
use case in the Bourne shell and switch in the C shell.
#!/bin/sh
case $1 in
aa|ab) echo A
;;
b?) echo “B \c”
echo $1;;
c*) echo C;;
*) echo D;;
esac
You can use any valid filename meta-characters within
the patterns to be matched. The ;; ends each choice
and can be on the same line, or following a
<newline>, as the last command for the choice.
Additional alternative patterns to be selected for a
particular case are separated by the vertical bar, |, as
in the first pattern line in the example above. The
wildcard symbols,: ? to indicate any one character
and * to match any number of characters, can be
used either alone or adjacent to fixed strings.
#!/bin/csh -f
switch ($1)
case aa:
case ab:
echo A
breaksw
case b?:
echo -n “B “
echo $1
breaksw
case c*:
echo C
breaksw
default:
echo D
endsw
breaksw is optional and can be used to break out of the
switch after a match to the string value of the
parameter is made. Switch doesn’t accept “|” in the
pattern list, but it will allow you to string several
case statements together to provide a similar result.
11.6.3) for and foreach
Loop through a list of string values
#!/bin/sh
for file in aa bb cc dd
do
cp $file.old $file.new
Done
#!/bin/csh -f
foreach file (aa bb cc dd)
cp $file $file.new
end
11.6.4) while
Loop as long as the condition is true.
#!/bin/sh
while [ $# -gt 0 ]
do
echo $1
shift
done
#!/bin/csh -f
while ($#argv != 0 )
echo $argv[1]
shift
end
11.6.5) until
This looping feature is only allowed in the Bourne shell.
The condition is tested at the start of each loop and the loop is
terminated when the condition is true.
#!/bin/sh
until [ $# -le 0 ]
do
echo $1
shift
done
11.7) TEST CONTROLS – CONTROL COMMANDS
test
Conditional statements are evaluated for true or false values. This
is done with the test, or its equivalent, the [] operators. It the
condition evaluates to true, a zero (TRUE) exit status is set,
otherwise a non-zero (FALSE) exit status is set. If there are
no arguments a non-zero exit status is set. The operators used
by the Bourne shell conditional statements are given below.
For filenames the options to test are given with the syntax:
-option filename
The options available for the test operator for files include:
-r true if it exists and is readable
-w true if it exists and is writable
-x true if it exists and is executable
-f true if it exists and is a regular file (or for csh, exists and
is not a directory)
-d true if it exists and is a directory
-h or -L true if it exists and is a symbolic link
-c true if it exists and is a character special file (i.e. the
special device is accessed one character at a time)
-b true if it exists and is a block special file (i.e. the device
is accessed in blocks of data)
-u true if it exists and is setuid (i.e. has the set-user-id bit
set, s or S in the third bit)
-g true if it exists and is setgid (i.e. has the set-group-id bit
set, s or S in the sixth bit)
-k true if it exists and the sticky bit is set (a t in bit 9)
-s true if it exists and is greater than zero in size
There are tests for strings:
-z string true if the string length is zero
-n string true if the string length is non-zero
string1 = string2 true if string1 is identical to string2
string1 != string2 true if string1 is non identical to
string2
string true if string is not NULL
There are integer comparisons:
n1 -eq n2 true if integers n1 and n2 are equal
n1 -ne n2 true if integers n1 and n2 are not equal
n1 -gt n2 true if integer n1 is greater than integer n2
n1 -ge n2 true if integer n1 is greater than or equal to
integer n2
n1 -lt n2 true if integer n1 is less than integer n2
n1 -le n2 true if integer n1 is less than or equal to
integer n2
11.8) Shell Programming – Menu Script (Exercise for you)
Create a script that will display a menu as can been seen on
the right.
Use user defined functions.
The output should be formatted and scrollable.
To find a file get the input [Filename/pattern] from user and
search from /user11/nalanda04/
My Utility Script
=============
Please choose between the following options:
1) Show Date
2) Show Memory Resources
3) Show disk space usage
4) Show active processes
5) Show the hostname
6) Show the username
7) Find a file
E) Exit
Please enter your Choice : _
So, This brings us to end our Unix tutorial, please comment if you have any question! Thanks for reading!
https://www.javamadesoeasy.com/2018/07/unix-tutorial-learn-in-just-3-days-with.html


