在本教程中,我们将使用 Vue 制作一个待办事项列表应用程序。这是我关于创建您的第一个 vue 应用程序的教程的后续内容。如果您需要入门帮助,请遵循该教程。由于最好的学习方式是尝试自己制作一些东西,因此本指南应该为您提供一个了解 Vue 工作原理的良好起点。
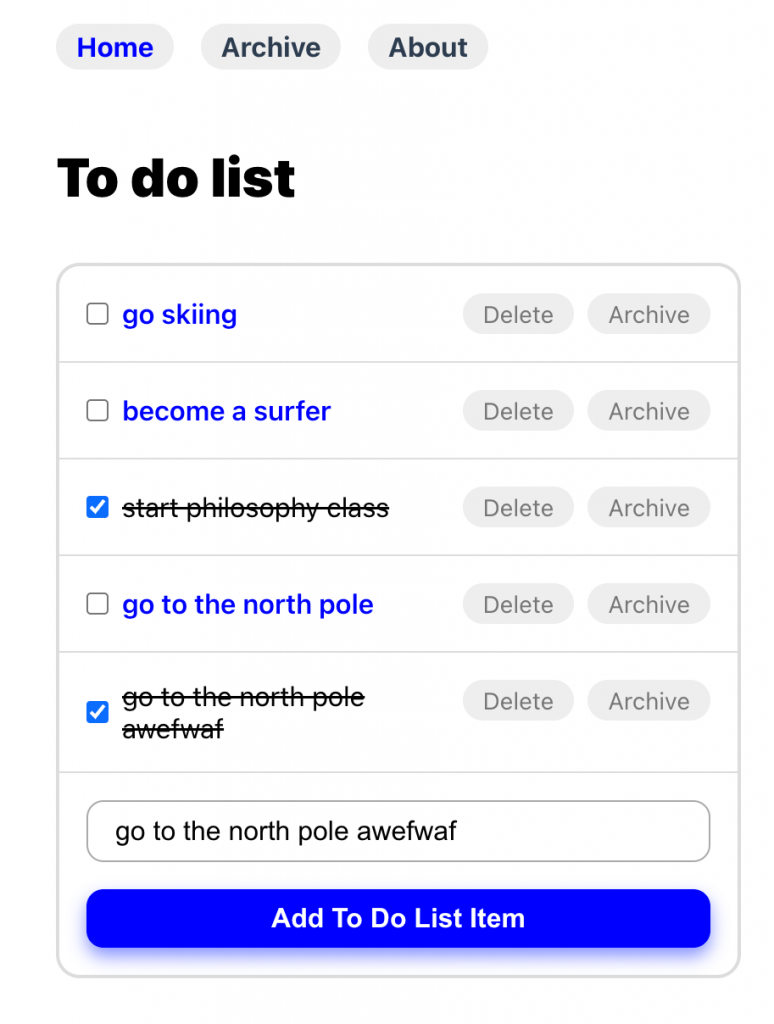
最终,我们的待办事项列表应用程序将如下所示:
制作一个 Vue 待办事项列表应用程序#
如果你已经按照我们的其他教程制作你的第一个 vue 应用程序,你应该有一个基本的 vue 文件结构。任何项目的第一步都是考虑你想要它做什么。对于我们的待办事项应用程序,我认为以下功能将是一个很好的起点:
- 存档页面– 这将包含我们已删除的所有待办事项列表项。
- 待办事项列表页面——这将是我们的主要待办事项列表页面,我们可以在其中添加和删除待办事项列表项。
- 持久列表– 如果我离开页面或刷新它,我希望列表存在。它不应该消失——所以我们需要存储。
- 一个关于页面– 一个简单的关于页面显示关于我们的一切以及我们的使命是什么。
在我们开始之前,让我们设置我们的文件结构。如果您已经学习了我们的其他教程,那么您应该对 Vue 应用程序的结构有一个基本的了解。对于这个项目,将您的文件设置为如下所示:
项目文件结构
public
|- index.html <-- 这是我们的应用程序将存在的文件
src
|- components <-- 存放组件的文件夹
|-- TodoList.vue <-- 今天我们只需要一个组件,我们的“TodoList”组件
|- router
|-- index.js <-- 我们的路线信息(页面的另一个词)
|- views
|-- About.vue <-- 关于页面
|-- Archive.vue <-- 存档页面
|-- Home.vue <-- 主页
| App.vue <-- 我们的主要应用代码
| main.js <-- 我们的 main.js,它将包含一些核心 Javascript
路由器Routers
注意:如果您没有路由器文件夹,您可以通过vue add router在您的 vue 文件夹中运行来添加它。
设置我们的路由器#
由于我们的 Vue 应用程序中有多个页面,因此我们需要在路由器index.js 文件中进行配置。在 router 文件夹中打开index.js,并将其更改为如下所示:
import { createRouter, createWebHistory } from 'vue-router'

const routes = [
  {
    path: '/',
    name: 'Home',
    component: () => import('../views/Home.vue')
  },
  {
    path: '/archive',
    name: 'Archive',
    component: () => import('../views/Archive.vue')
  },
  {
    path: '/about',
    name: 'About',
    component: () => import('../views/About.vue')
  }
]

const router = createRouter({
  history: createWebHistory(process.env.BASE_URL),
  routes
})

export default router
我们在之前的教程中已经介绍了这一点,但本质上这将创建 3 个不同的页面 –/archive和//about – 并为它们启用历史 API。我们import()用来导入我们之前在文件结构中创建的页面 – 那些存在Archive.vue和.Home.vueAbout.vue
使用 Vuex 在 Vue 中存储数据#
现在我们有了应用程序的“结构”,让我们讨论如何在应用程序中存储数据。Vue 有一个非常有用的插件叫做Vuex,它是一个状态管理工具。这意味着我们可以从 Vue 获取所有数据,将其存储在 Vuex 存储中,我们将能够轻松管理所有数据。要安装 vuex,只需在 vue 文件夹中运行以下命令:
npm i vuex
将 Vuex 添加到我们的应用程序
由于我们已经安装了 Vuex,我们可以开始在我们的应用程序中配置它。让我们专注于我们将如何操作和存储我们的数据。我们将 Vuex Store 直接添加到src文件夹中的 main.js文件中。将该文件更改为以下内容,以便我们可以启动存储:
import { createApp } from 'vue'
import { createStore } from 'vuex'
import App from './App.vue'
import router from './router'

const app = createApp(App);

// Create a store for our to do list items
const store = createStore({
    state() {

    },
    getters: {

    },
    mutations: {

    }
});

app.use(router).use(store).mount('#app')
Vuex 允许我们为我们的数据创建一个存储。我们会将整个待办事项列表存储在 Vuex 商店中。在 Vuex 中,我们将利用 3 个主要功能:
- state() – 这是我们存储数据的地方。我们所有的待办事项列表数据都会放在这里。
- getters – 这完全符合您的想法 – 它让我们可以从我们的商店获取数据。
- 突变——这些是我们将用来更新我们的状态数据的函数——所以这些函数将更新我们的待办事项列表——例如,将一个项目标记为完成。
Vuex 中的State和Getters#
我们将在我们的商店中看到的两个最简单的功能将是我们的state()和getters。让我们考虑一下如何将待办事项列表项存储在state(). 我们的待办事项列表项有几个不同的属性——它们将有一个名称,并且可能有一个唯一的id。我们需要标记它们所在的页面(主页或存档),并且我们需要一个选项来设置它们是否完成。
因为getters,当我们想要获取我们的待办事项列表时,我们实际上只需要一种方法——获取我们所有的待办事项列表项。下面,我配置了一个默认的 todo 列表项,以及一个简单地获取我们所有的 todo 列表的 getter:
const store = createStore({
    state () {
        return {
            todos: [
                // I've added one default todo below which will show when you first access the page.
                // You can remove this if you want!
                // id String] can be any unique ID
                // name String] is the name of our item
                // completed [Boolean] is set to true when done, false when not
                // location<['home', 'archive']> is set to home or archive depending on which page we want to show it on
                { id: 'first-element', name: 'My First To Do Item', completed: false, location: 'home' }
            ]
        }
    },
    getters: {
        todos (state) {
            // Returns every todo list (state stores our data,
            // so state.todos refers to our entire todo list)
            return state.todos;
        }
    }
    mutations: {

    }
}
在我们的代码中,我们稍后将能够调用getters.todo来检索我们所有的待办事项列表项。现在我们有了存储数据的存储,以及获取数据的方法。接下来让我们看看我们将如何改变我们的数据。
用 Vuex 改变我们的数据#
现在让我们考虑一下我们的数据可能会如何变化。我们的数据有几种变化方式:
- 我们可以将待办事项列表项标记为已完成。
- 我们可以添加一个新的待办事项列表项。
- 我们可以删除一个待办事项列表项。
- 我们可以归档一个待办事项列表项。
因此,我们将制作4 个变异函数。让我们从第一个 – 开始updateTodo。
mutations: {
    updateTodo (state, todoItem) {
        // the state argument holds all of our data
        // the todoItem argument holds the data about a particular todo list item
        // Let's get all the data from the todoItem
        let id = todoItem.id;
        let completed = todoItem.completed;
        let name = todoItem.name;
        // Let's find the item in our state we are trying to change, by checking for its ID
        let findEl = state.todos.find((x) => x.id == id);
        if(findEl !== null) {
            // If we find it, then we'll update complete or name if those properties exist
            if(completed !== undefined) {
                findEl.completed = completed;
            }
            if(name !== undefined) {
                findEl.name = name;
            }
        }
        else {
            // Otherwise lets console log that the item can't be found for some reason
            console.log(`To Do List Item ${id} couldn't be found`);
        }
    }
}
在上面的代码中,state将保存我们的待办事项列表数据,同时todoItems将保存正在更改的项目。你可能想知道,我们怎么知道哪个项目是变化的?当我们创建我们的Home.vue页面时,我们将能够将数据传递给我们的突变,让函数知道哪个项目正在改变。在设计这个时,我们可以考虑我们可能需要哪些数据来改变我们的状态,然后在我们构建前端时将这些数据传递给存储。
我们将需要的其他 3 个变异函数如下所示,但它们都遵循与updateTodo. mutation:{}在您的列表中添加这些。
addTodo (state, todoItem) {
    // Check we have all the right properties to make an element
    if(todoItem.id !== undefined && typeof todoItem.name == 'string' && typeof todoItem.completed == 'boolean') {
        // Push our new element to our store!
        state.todos.push({
            id: todoItem.id,
            name: todoItem.name,
            completed: todoItem.completed,
            location: 'home'
        })
    }
},
deleteTodo (state, todoItem) {
    // Check for the id of the element we want to delete
    let id = todoItem.id;
    let removedEl = state.todos.findIndex((x) => x.id == id);
    if(removedEl !== null) {
        // If it exists, delete it!
        state.todos.splice(removedEl, 1);
    }
},
moveTodoItem (state, todoItem) {
    // Check for the id and location information
    let id = todoItem.id;
    let location = todoItem.location;
    let findEl = state.todos.find((x) => x.id == id);
    // If the item exists, update its location
    if(findEl !== null) {
        findEl.location = location;
    }
    else {
        // Otherwise console log a message
        console.log(`To Do List Item ${id} couldn't be found`);
    }
}
如何将 Vuex 数据保存到本地存储#
现在我们已经设置了整个数据存储。我们可以根据需要操纵和更改我们的商店。最后一个难题是我们需要一种方法来保存更改。Vuex 不坚持。如果刷新页面,数据就会消失,这不是我们想要的。因此,我们需要再添加一个函数,它会在发生突变时触发。这种方法称为subscribe. 将它添加到你的底部main.js,就在之前app.use(router).use(store).mount('#app'):
store.subscribe((mutation, state) => {
    // The code inside the curly brackets fires any time a mutation occurs.
    // When a mutation occurs, we'll stringify our entire state object - which
    // contains our todo list. We'll put it in the users localStorage, so that
    // their data will persist even if they refresh the page.
    localStorage.setItem('store', JSON.stringify(state));
})
现在,将某些内容保存在 localStorage 中是一回事 – 将其展示给用户是另一回事。因此,我们需要在页面加载时更新整个 Vuex 状态。首先要做的是进行一个新的突变,我们称之为loadStore. 所有这一切都会打开localStorage,检索我们的数据,并将state数据存储的值设置为找到的值。
mutations: {
	loadStore() {
        if(localStorage.getItem('store')) {
            try {
                this.replaceState(JSON.parse(localStorage.getItem('store')));
            }
            catch(e) {
                console.log('Could not initialize store', e);
            }
        }
    }
    // ... other mutations
}
我们希望在应用程序加载时运行它,这样我们就可以将本地存储同步到我们的 Vuex 存储 – 所以我们需要将它添加到我们的App.vue文件中。更改您的脚本以导入我们的 store ( useStore()),然后我们可以loadStore使用commit(). 这是连接所有内容的最后一步。
<script>
    import { useStore } from 'vuex'
    export default {
        beforeCreate() {
            // Get our store
            const store = useStore()
            // use store.commit to run any mutation. Below we are running the loadStore mutation
            store.commit('loadStore');
        }
    }
</script>
这就是我们数据所需的一切。让我们回顾一下我们在这里所做的事情:
- 我们创建了一个新的 Vuex 商店。这样我们就可以存储我们的待办事项列表数据。
- 我们创建了一个 getter 方法来从我们的 Vuex 存储中加载任何待办事项列表数据。
- 我们创建了许多突变来操纵我们的 Vuex 存储数据。
- 我们创建了一个函数来将我们的 Vuex 存储放入本地存储。然后我们将它也放入我们的 App.vue 文件中,以确保我们的本地存储和 Vuex 存储保持同步。
实现我们的待办事项列表前端#
困难的部分已经结束,我们终于可以开始创建我们的前端了。我们将为我们的待办事项列表应用程序制作一个组件 – TodoList.vue,我们将把它放在src/components文件夹中。我们的组件将有一个属性 – location,它可以让我们区分我们是在存档页面上还是在主页上。
让我们从组件的基本 Javascript 开始。首先,让我们导入我们的 Vuex 存储,并将其全部放在我们组件的data()函数中。让我们也 import uuid,让我们为待办事项列表项提供 ID。您可以通过运行以下代码来安装 uuid:
npm i uuid
我还将包含一个名为 的数据元素newTodoItem,我们将在添加新的待办事项列表项时使用它。现在,我们的 Javascript 将如下所示:
<script>
    import { useStore } from 'vuex'
    import { v4 as uuidv4 } from 'uuid'

    export default {
        name: "TodoList",
        data() {
            return {
                // Used for adding new todo list items.
                newTodoItem: ''
            }
        },
        props: {
            location: String
        },
        setup() {
            // Open our Vuex store
            const store = useStore()
            // And use our getter to get the data.
            // When we use return {} here, it will
            // pass our todos list data straight to
            // our data() function above.
            return {
                todos: store.getters.todos
            }
        }
    }
</script>
现在我们存储的所有待办事项列表数据都将在我们的data()函数中。您可能还记得我们的待办事项列表项看起来有点像这样:
[{ id: 'first-element', name: 'My First To Do Item', completed: false, location: 'home' }]
鉴于我们知道待办事项列表项的结构,我们可以开始在我们的应用程序中显示它们。将以下模板添加到您TodoList.vue的脚本标记上方:
<template>
    <div id="todo-list">
        <div class="list-item" v-for="n in todos" :key="n.id">
            <div class="list-item-holder" v-if="n.location == location" :data-status="n.completed">
                <input type="checkbox" :data-id="n.id" :id="n.id" @click="updateTodo" :checked="n.completed"> <label :data-id="n.id" :for="n.id"></label>
                <div class="delete-item" @click="deleteItem" :data-id="n.id">Delete</div>
                <div class="archive-item" v-if="n.location !== 'archive'" @click="archiveItem" :data-id="n.id">Archive</div>
            </div>
        </div>
        <div id="new-todo-list-item">
            <input type="text" id="new-todo-list-item-input" @keyup="updateItemText">
            <input type="submit" id="new-todo-list-item-submit" @click="newItem" value="Add To Do List Item">
        </div>
    </div>
</template>
这只是普通的 HTML。在底部,我们有一些输入,我们将使用它们来添加新的待办事项列表项。在顶部,我们正在使用v-forVue 附带的功能。使用v-for,我们可以遍历我们的待办事项数组,并以反应方式显示它们。我们将使用我们的待办事项列表 ID 作为每个的键,这由以下行显示:
<div class="list-item-holder" v-if="n.location == location" :data-status="n.completed">
还记得我们说过我们的组件会有一个名为 location 的属性吗?好吧,我们只想显示待办事项列表项位置与属性匹配的待办事项列表项。如果我们在主页上,我们只想显示“主页”待办事项。所以下一行就是这样做的,使用v-if. 如果待办事项列表位置n.location与属性相同location,则会显示。如果不是,它不会。
<div class="list-item-holder" v-if="n.location == location" :data-status="n.completed">
接下来的几行简单地从待办事项列表项中提取名称和 ID 信息以在我们的应用程序中显示它。我们还有两个按钮,一个用于删除,一个用于归档我们的待办事项列表项。您会注意到 Vue 中的事件显示为@click、 或@keyup。每当用户在该元素上单击或按键时,它们就会触发。其中的文本是我们将调用的函数,但我们还没有定义它们。因此,让我们开始定义我们的函数,以便我们可以将数据发送回我们的 Vuex 存储。
待办事项列表前端方法#
正如我们所说,我们有许多“事件”,只要用户单击或将待办事项列表项标记为完成,就会触发这些“事件”。例如,当他们单击复选框时,我们运行updateTodo. 不过,我们需要定义这些函数,所以现在就开始吧。我们所有的函数(也称为方法)都将存储在我们的export default {}Javascript 中,在methods: {}.
由于我们已经初始化了我们的数据存储,我们可以通过this.$store. 还记得我们在 store 中定义了一堆突变事件吗?我们现在将针对这些并触发信息以实时更新我们的商店。让我们看一个例子,updateTodo。在这里,我们想要将待办事项的状态更改为已完成或未完成。所以我们将首先获得新的状态,并将其发送到我们的 Vuex 商店。
要在 Vuex 商店上触发突变,我们使用store.commit. 第一个参数是我们想要触发的突变,第二个是我们想要发送的数据。因此,我们的方法如下所示updateTodo:
methods: {
    updateTodo: function(e) {
        // Get the new status of our todo list item
        let newStatus = e.currentTarget.parentElement.getAttribute('data-status') == "true" ? false : true;
        // Send this to our store, and fire the mutation on our
        // Vuex store called "updateTodo". Take the ID from the
        // todo list, and send it along with the current status
        this.$store.commit('updateTodo', {
            id: e.currentTarget.getAttribute('data-id'),
            completed: newStatus
        })
    }
}
我们的其余方法遵循相同的模式。获取待办事项列表的 ID – 并将其与新数据一起发送到我们的商店。我们存储中的突变事件然后更新 Vuex 存储,并且由于我们实现了该subscribe方法,它会在我们的本地存储中自动更新。以下是我们所有的方法,包括添加新项目的方法:
methods: {
    // As a user types in the input in our template
    // We will update this.newTodoItem. This will then
    // have the full name of the todo item for us to use
    updateItemText: function(e) {
        this.newTodoItem = e.currentTarget.value;
        if(e.keyCode === 13) {
            this.newItem();
        }
        return false;

    },
    updateTodo: function(e) {
        // Get the new status of our todo list item
        let newStatus = e.currentTarget.parentElement.getAttribute('data-status') == "true" ? false : true;
        // Send this to our store, and fire the mutation on our
        // Vuex store called "updateTodo". Take the ID from the
        // todo list, and send it along with the current status
        this.$store.commit('updateTodo', {
            id: e.currentTarget.getAttribute('data-id'),
            completed: newStatus
        })
    },
    deleteItem: function(e) {
        // This will fire our "deleteTodo" mutation, and delete
        // this todo item according to their ID
        this.$store.commit('deleteTodo', {
            id: e.currentTarget.getAttribute('data-id')
        })
    },
    newItem: function() {
        // If this.newTodoItem has been typed into
        // We will create a new todo item using our
        // "addTodo" mutation
        if(this.newTodoItem !== '') {
            this.$store.commit('addTodo', {
                id: uuidv4(),
                name: this.newTodoItem,
                completed: false
            })
        }
    },
    archiveItem: function(e) {
        // Finally, we can change or archive an item
        // using our "moveTodoItem" mutation
        this.$store.commit('moveTodoItem', {
            id: e.currentTarget.getAttribute('data-id'),
            location: 'archive'
        })
    }
}
最后,我添加了一些基本样式来划掉标记为完成的项目。</script>在你的最终标签之后添加这个:
<style scoped>
    .list-item-holder {
        display: flex;
    }

    [data-status="true"] label {
        text-decoration: line-through;
    }
</style>
把它们拉到一起#
我们现在有一个可靠的 Vuex 存储和一个TodoList.vue组件。最后一步是将它集成到我们的 Home.vue 页面中——这很容易。只需导入组件,然后将其添加到您的Home.vue模板中:
<template>
    <h1>To do List:</h1>
    <TodoList location="home" />
</template>

<script>
import TodoList from '../components/TodoList.vue';

export default {
    name: "HomePage",
    components: {
        TodoList
    }
}
</script>
在我们的存档页面上,我们将拥有相同的内容,只是我们的TodoList位置将设置为“存档”。
    <template>
        <TodoList location="archive" />
    </template>
设计我们的待办事项应用程序#
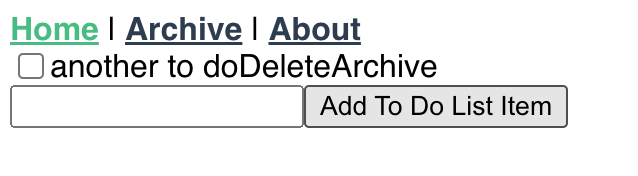
现在我们完成了,我们可以通过运行以下命令来测试我们的待办事项列表,这将让我们在http://localhost:8080上查看它:
npm run serve
我们应该有一个看起来像这样的待办事项列表:
我将把页面的整体设计留给您,但我已经对其进行了一些更新,使其看起来更现代一些。以下所有样式都将在最终代码仓库中提供。经过一番努力,我找到了这个设计:

演示#
我已经在 Github Pages 上设置了最终应用程序外观的演示。你可以在这里找到演示。如果您想了解我们将构建的内容,请查看它。
结论#
我希望你喜欢这份关于制作待办事项列表应用程序的指南。当您开始更多地了解 Vue 时,尝试自己的应用程序想法很重要,以便更多地了解它的实际工作原理。通过这个例子,我们已经涵盖了很多新的想法:
- 在 Vue 中配置你的路由器。
- 使用 Vuex 的数据存储 – 以及它们是如何工作的。
- 与数据存储交互,并使 Vuex 数据存储持久保存在本地存储中。
- 使用 .创建与 Vuex 数据存储交互的组件
store.commit。 - 使用自定义道具将这些组件实现到主页中
与往常一样,您可以在下面找到一些有用的链接:


