任何在Android上遇到过non-trivial重要bug的人可能都知道,有时,修复它们需要花费大量的时间和精力。其他时候,情况甚至更糟 – 重现错误需要花费大量时间。在某些情况下,除了在不同条件下重新启动应用程序之外,别无他法:使用网络,没有网络,没有缓存,网络不良,服务器的错误响应等。
由于不断重新启动需要大量长时间的单一类型操作,例如,用数据填充字段,这种情况可能会加剧。在本文中,我想描述此问题的一种可能的解决方案。让我们开始吧
观察和假设
- 假设您熟悉 adb
- 此解决方案适用于填充 XML、撰写、webView 和其他视觉对象类型以及其他应用程序的字段。
- 从暂存文件运行 kotlin 脚本有时会导致错误。目前没有干净的解决方案。解决此问题的快速方法是创建另一个暂存文件。

选择示例
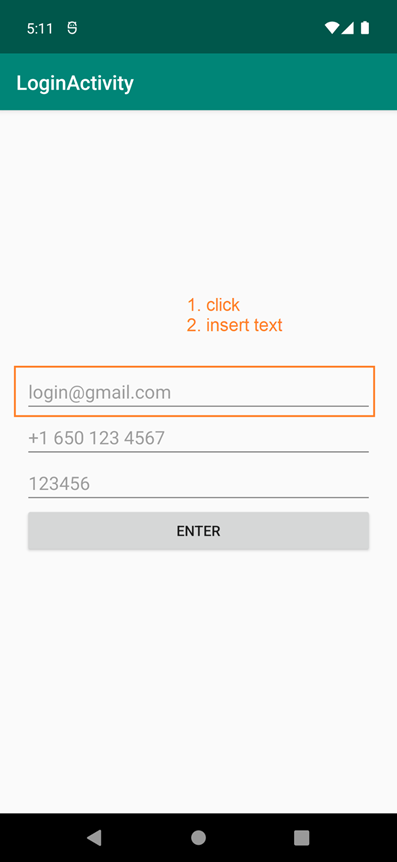
假设我们有一个由两个活动组成的应用程序:LoginActivity和MainActivity。要转到“MainActivity”,您需要填写“LoginActivity”中的字段,然后按 Enter 键:

Code:
package com.leonidivankin.draftandroid.articles.autofill
import android.os.Bundle
import androidx.appcompat.app.AppCompatActivity
class MainActivity : AppCompatActivity() {
    override fun onCreate(savedInstanceState: Bundle?) {
        super.onCreate(savedInstanceState)
        title = "MainActivity"
    }
}
<?xml version="1.0" encoding="utf-8"?>
<androidx.constraintlayout.widget.ConstraintLayout xmlns:android="http://schemas.android.com/apk/res/android"
    xmlns:app="http://schemas.android.com/apk/res-auto"
    xmlns:tools="http://schemas.android.com/tools"
    android:layout_width="match_parent"
    android:layout_height="match_parent"
    android:padding="24dp"
    tools:context=".articles.autofill.LoginActivity">
    <EditText
        android:id="@+id/editTextEmail"
        android:layout_width="match_parent"
        android:layout_height="wrap_content"
        android:hint="login@gmail.com"
        app:layout_constraintBottom_toTopOf="@+id/editTextPhone"
        app:layout_constraintTop_toTopOf="parent"
        app:layout_constraintVertical_chainStyle="packed" />
    <EditText
        android:id="@+id/editTextPhone"
        android:layout_width="match_parent"
        android:layout_height="wrap_content"
        android:hint="+1 650 123 4567"
        app:layout_constraintBottom_toTopOf="@+id/editTextPassword"
        app:layout_constraintTop_toBottomOf="@+id/editTextEmail" />
    <EditText
        android:id="@+id/editTextPassword"
        android:layout_width="match_parent"
        android:layout_height="wrap_content"
        android:hint="123456"
        app:layout_constraintBottom_toTopOf="@+id/buttonEnter"
        app:layout_constraintTop_toBottomOf="@+id/editTextPhone" />
    <Button
        android:id="@+id/buttonEnter"
        android:layout_width="match_parent"
        android:layout_height="wrap_content"
        android:text="enter"
        app:layout_constraintBottom_toBottomOf="parent"
        app:layout_constraintTop_toBottomOf="@+id/editTextPassword" />
</androidx.constraintlayout.widget.ConstraintLayout>
package com.leonidivankin.draftandroid.articles.autofill
import android.content.Intent
import android.os.Bundle
import androidx.appcompat.app.AppCompatActivity
import com.leonidivankin.draftandroid.databinding.ActivityLoginBinding
class LoginActivity : AppCompatActivity() {
    private lateinit var binding: ActivityLoginBinding
    override fun onCreate(savedInstanceState: Bundle?) {
        super.onCreate(savedInstanceState)
        binding = ActivityLoginBinding.inflate(layoutInflater)
        setContentView(binding.root)
        title = "LoginActivity"
        binding.buttonEnter.setOnClickListener {
            if (binding.editTextEmail.text.toString() == "login@gmail.com"
                && binding.editTextPhone.text.toString() == "+1 650 123 4567"
                && binding.editTextPassword.text.toString() == "123456"
            )
                startActivity(Intent(this, MainActivity::class.java))
        }
    }
}
要移至“MainActivity”,必须填写字段,并且其值必须满足特定要求。例如,取以下值:
电子邮件: login@gmail.com 电话: +1 650 123 4567
如您所见,从启动到MainActivity大约需要1分钟。这仍然是假设在填充数据时几乎没有错误。有时,查找复杂的 bug 需要多次重新生成应用程序并在设备上重新启动。这意味着不断填写字段以进一步进入应用程序。
事实证明,每次重新启动时,我们都会额外损失大约1分钟。理想的情况是直接跳转到MainActivity,绕过LoginActivity,但在大型项目中,由于需要从服务器获取令牌,这通常是不可能的。
此问题的另一种可能的解决方案是为这些字段分配默认值。但是,这并不总是可能的,因为这些字段可能位于外部SDK开发工具包或 web 视图中。在这种情况下,您将无法设置默认值。
随着我们的继续,我将向您展示如何使用 kotlin 脚本优化字段的填充。
自动填充字段
查找必要的 adb 命令
我将使用adb命令来填充文本字段。要填写一个文本字段,我们需要:
- 单击文本区域。
- 用文本填充它。
要单击文本区域,必须使用 adb 命令:
adb shell input tap x y
其中 x 和 y 是相对于设备左上角的坐标(以像素 (px) 为单位)。它们可以以不同的方式找到:
- 有一个 adb 命令知道如何确定点击坐标:
adb shell getevent -l
但是在坐标的转换方面存在困难。您可以在此处阅读更多内容。
- 在实际设备上,您可以启用开发人员的设置以显示单击坐标或网格。
- 您可以添加一个侦听器,该侦听器将在每次单击时给出绝对坐标。
- 您也可以通过布局检查器Layout Inspector.找到答案。
在这个例子中,我更愿意使用第4段。
- 启动布局检查器。
- 连接到当前进程。
- 选择必要的视图。
- 检查其坐标。这将取决于设备的大小和类型。最有可能的是,您的坐标会有所不同。
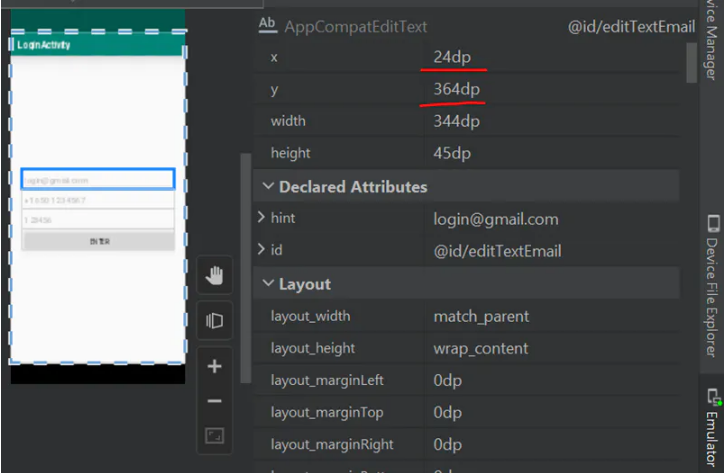

6.请注意,这些坐标以 dp 为单位。adb 命令需要以 px 为单位的坐标。在我的情况下,它是x:243 =72,y:3643 = 1092
7.最后一个命令原来是:
adb shell input tap 72 1092
8.转到终端并输入以下命令:

9.文本输入字段现在处于活动状态。
要找出像素密度,您需要转到设备管理器:
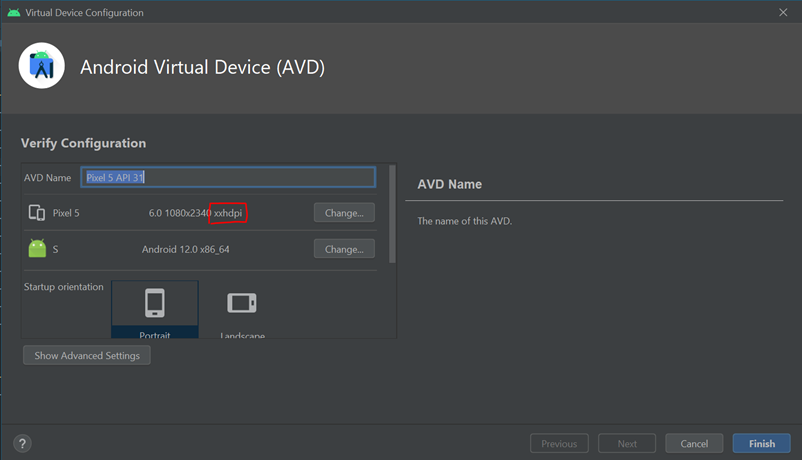
在我的情况下,它是xxhdi。此处,dp 和 px 之间的比率为 3。此处更详细地描述了这些比率。
接下来,您必须在字段中输入所需的文本。为此,请使用以下命令:
adb shell input text 'login@gmail.com'
将其输入终端并检查是否输入了必要的电子邮件。对其他文本字段执行类似的操作:电话,密码。接下来,我们需要单击该按钮,为此,有一个命令:
adb shell input tap 72 1497
我已经把我需要的坐标放在那里了。
我们找到了所有必要的adb命令来填写所有文本字段,然后单击按钮。以下是完整列表:
adb shell input tap 72 1092
adb shell input text 'login@gmail.com'
adb shell input tap 72 1227
adb shell input text '+1 650 123 4567'
adb shell input tap 72 1362
adb shell input text 123456
adb shell input tap 72 1497
现在我们需要从这些命令构建一个脚本,这些脚本将代替我们来执行它们。
创建kotlin 脚本
您可以以不同的方式和不同的语言构建脚本。以下是一些选项:
- 制作一个 bash 脚本。
- 为Android Studio制作一个插件。
- 制作Gradle task等。
但这些方法中的每一种都有缺点。bash脚本很难维护,Android Studio的插件需要为新版本的环境进行维护,由于与gradle和gradle wrapper的依赖关系,分级任务需要很长时间才能运行。
所以我使用另一种方式 – kotlin-script(kts)。kotlin语言对机器人开发人员来说更熟悉,脚本独立于项目,机器人工作室和分级。
使用 Ctrl+Alt+Shift+Insert (窗口)创建暂存文件。在出现的窗口中,选择“Kotlin”:
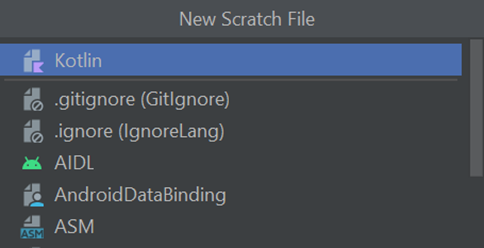
这将创建一个scratch .kts 文件。

请注意绿色箭头。这意味着该文件是可执行的并且可以运行。取消选中交互模式,以便脚本不会在每次更改文件时重新启动。
有一种特殊方法允许您从 kotlin 脚本执行 adb 命令:
Runtime.getRuntime().exec()
插入我们所有的命令。我的完整暂存文件如下:
fun run(){
   run("adb shell am force-stop com.leonidivankin.draftandroid")
   run("adb shell am start -n \"com.leonidivankin.draftandroid/com.leonidivankin.draftandroid.articles.autofill.LoginActivity\" -a android.intent.action.MAIN -c android.intent.category.LAUNCHER")
   Thread.sleep(2000)
   run("adb shell input tap 72 1092")
   run("adb shell input text 'login@gmail.com'")
   Thread.sleep(500)
   run("adb shell input tap 72 1227")
   run("adb shell input text '+1 650 123 4567'")
   Thread.sleep(500)
   run("adb shell input tap 72 1362")
   run("adb shell input text 123456")
   Thread.sleep(500)
   run("adb shell input tap 72 1497")
}
fun run(command: String){
   Runtime.getRuntime().exec(command)
}
此文件包含我们上面定义的adb命令,并添加了一些内容。
请注意,我首先插入了这些行:
fun run(){
   run("adb shell am force-stop com.leonidivankin.draftandroid")
   run("adb shell am start -n \"com.leonidivankin.draftandroid/com.leonidivankin.draftandroid.articles.autofill.LoginActivity\" -a android.intent.action.MAIN -c android.intent.category.LAUNCHER")
当应用程序正在运行时,您需要重新启动它时,需要这些行。
我还将 exec() 命令放在一个单独的方法中,以减少代码量:
fun run(command: String){
   Runtime.getRuntime().exec(command)
}
请注意,某些命令之间具有线程.sleep()。这是等待应用程序启动或输入上一个命令。关键是adb命令是异步执行的。并且有可能将焦点转移到下一个文本字段,而无需等待当前字段中的文本输入。
从启动到 MainActivity 的总转换时间不超过 5 秒,这减少了 20 倍的时间。
结论
正如史蒂夫·麦康奈尔在《完美代码》中所写的那样,编程是一件复杂的事情。它变得更加复杂,因为您必须寻找复杂且非平凡的错误。因此,从我的角度来看,任何优化的作用都相当高。尽管在整个项目的框架内,它们似乎是微观的。尝试通过自动完成字段来优化应用程序的启动。


